The process of creating assets for a game engine has always involved striking a balance between audiovisual fidelity and performance. Every single feature you add to your project has an impact, so it’s important that impact is reduced to a minimum wherever possible.
Animation data is no different, and Unity provides us with a certain degree of control over its optimization.
In Unity, animation compression is an optimization term used to describe a range of techniques that will reduce the memory footprint of your animation clips. This saving comes with an associated cost in a loss of animation precision, which may cause your keyframed values to drift from their original positions.
Unlike the texture compression options we discussed in a previous article, which came down to picking from a list of compression profile presets, Unity’s animation compression system gives the user a lot more control.
In this article we’re going to explore those options, and show the effect of each with a few practical example animations.
What is animation compression?
Animation compression is an optimization process intended to reduce the memory footprint of your animation data without compromising its appearance. Although the specific methods used to achieve this can differ significantly between implementations, this usually involves analyzing and modifying superfluous and/or lower-priority information while keeping the integrity of the original curve intact.

Note that although there has been a significant reduction in keyframes, the shape of the curve has been altered.
When executed well it can be difficult to spot the difference between an uncompressed clip and it’s optimized counterpart, but the performance gain is often substantial. This is especially noticeable within animation-heavy projects.
Why is animation compression necessary?
Animation compression is a foundational part of the animation production pipeline. Without it our animation data would take up a huge chunk of the performance budget, our games would run slower and/or have less content, and as a consequence no one would buy them and all our hard work would have been for nothing.
Okay maybe it’s not as bad as all that, but in their documentation Unity does highly recommend that animation compression should always be enabled and this is fantastic advice to follow for a few reasons. It reduces the size of your animation data, gives you more memory to play with at runtime (or if things aren’t working out too well in that department, it will help get your fps back above 30) and will mean your game takes up less space on disk.
To better illustrate this, let’s look at a real-world example. Here is a simple one-shot motion capture animation I acquired from the Mixamo Animation Library. It’s 71 frames in length, sampled at 30fps. With a rig consisting of 53 bones, each with multiple rotation tracks, we’re talking over 11,000 individual keyframes and a file size of 249kb for the uncompressed animation.

We’ll talk more about what these numbers mean a bit further down.
This might seem like a lot of data for just a few seconds of animation (a minute of animation like this would be approximately 6.3mb) but it’s not an abnormal amount of keys for a motion capture animation of this length. However, if we want to use this animation practicably in Unity there is a lot we can do to reduce its impact.
With just the default level of animation compression for Generic rigs (Keyframe reduction with an error tolerance of 0.5, we’ll talk more about this in the next section) we can reduce the size of this animation by almost 50% with negligible impact on visual fidelity.
To put that saving into perspective, using animation compression on our animation here has instantly doubled our animation budget. If we wanted to be a little more aggressive with our compression settings, we could easily get even more, but these savings come with a cost.
Your options for animation compression in Unity
In Unity your animation data is stored in an Animation Clip asset. These are the basic building blocks of Unity’s animation system and where the keyframe information is saved.

and I’ll be sharing some example screenshots from this window as we go.
Animation compression settings can be modified per rig asset (but not per Animation Clip) in the Animation tab of the Inspector. This compression process happens on import, so if you need to change these settings Unity will automatically re-import the asset for you. You can’t change the animation compression settings at runtime.

Off (no compression)
Let’s start with the easiest one. The Off setting does exactly what you think it does – it disables animation compression for all of the Animation Clips stored in that asset.
Your animation in Unity will be identical to the source, and as a consequence have the largest impact on performance. This is what the Unity Editor tooltip has to say about this setting:
“It is generally not advisable to use this option – if you need higher precision animation, you should enable keyframe reduction and lower allowed Animation Compression Error values instead.”
What a great segue, let’s talk about keyframe reduction!
Keyframe Reduction
Keyframe reduction is the simplest of the two available compression formats, and as the name suggests it will attempt to wholesale remove redundant keyframes from your animation to save memory.
Unity gives animators some control over just how much data is removed through three values called Animation Compression Errors; one for position, rotation, and scale.

The Animation Compression Error value for Rotation is calculated in degrees. The Position and Scale values are treated as a percentage (ostensibly from 0 to 100, but you can go far beyond that if you really want to), which represent the amount of acceptable variation from the source asset. The greater the allowed variation, the more aggressive the compression will be and the greater the performance increase.
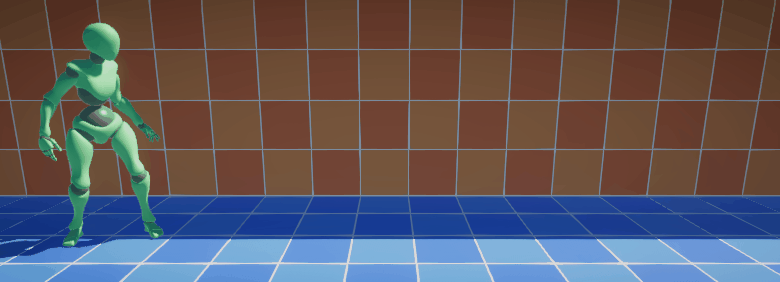
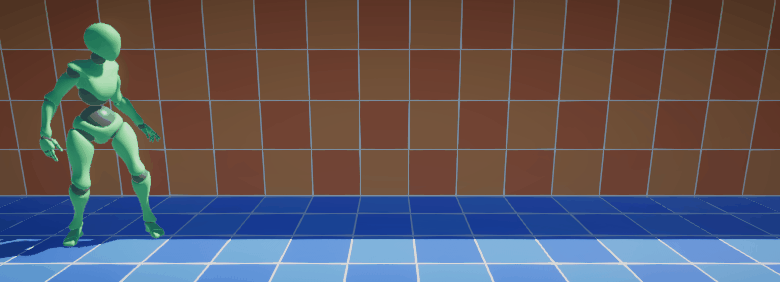
Here are some examples of the same animation with keyframe reduction enabled with increasingly larger error compression values. At first you might notice the drop in precision causes some subtle drifting (particularly in the feet placement), which only gets worse as the compression error value gets higher.


Optimal
The Optimal animation compression format is newer, and it’s the default and preferred method for Humanoid rigs. Unfortunately its inner workings are a little more opaque and it’s surprisingly difficult to find concrete information on how it works. This is how the editor’s tooltip describes the Optimal compression format:
“Let Unity decide how to compress, either by keyframe reduction or by using dense format.”
Alright then.
In figuring this one out I owe a huge debt of gratitude to Nicholas Frechette, the author of the Animation Compression Library. Nicholas has a wealth of experience (and some contacts at Unity Technologies!) and was able to elucidate the process in a breakdown that you can read for yourself here.
Put simply, Unity will analyze your animation and choose between keyframe reduction (with user-defined compression error settings) and a full precision ‘dense’ curve based on what it thinks would look ‘best’.
Nicholas writes that Unity seems to fall back on the dense curve when the source animation is short, or when it’s very noisy (like what you’d see with motion capture).
You can see the number of curve tracks your animation is using in the Inspector, and comparing the output between compression settings reveals a pretty clear winner.

Further reading
Animation compression is a fascinating subject, and this introduction has barely scratched the surface. There is a lot that Unity does for us that we rarely see, and even more rarely appreciate.
If you’d like to learn more about this stuff, I highly recommend having a read of An Idiot’s Guide to Animation Compression by Bobby Anguelov. It’s a great exploration of the subject, and Bobby will take you all the way down that rabbit hole before climbing all the way back out the other side with some really interesting conclusions.
If you have any questions, or if you’ve spotted something incorrect or incomplete (it happens all the time) please drop me a message!
Thanks for reading.