A little while ago I was attached to a project set in a loft apartment with an expensive TV as its centerpiece. A video file had to both play on the screen and dynamically light the environment in as realistic a manner as possible, all the while having a minimal impact on performance because the budget was already tapped. It was a fun exercise, and this is the effect I came up with.
This tutorial will teach you how to create a dynamically lit TV screen effect in Unreal Engine 4 using Light Functions. Versatile and easy on system resources, the effect uses a scrolling ‘movie barcode’ to approximate light emitting from a video display.
We’ll be starting from scratch in an entirely new project so the only thing you’ll need to prepare beforehand is the video file you’d like your TV to display.
Download the Unreal project
If you’d like to skip straight to the end, the project files from this tutorial are available for download on my GitHub. Feel free to pick it apart and use it in whatever manner serves you and your own projects.
Project overview
This effect is made almost entirely within the engine using Blueprint and the Material Editor, and will work in Unreal Engine 4.20 and above. This is because we’ll need Rect Lights, which were only introduced in 4.20.
The dynamic light effect is achieved by panning through a ‘movie barcode’ texture in time with the video, and feeding that information into one or more Rect Lights via a Light Function.

I’m quite proud of this effect and I’m keen to share it with you, so let’s get started!
Adding your video file to the project
The first thing we’ll need to do to get your video playing in the Editor is to copy it into your project directory. This has to be done via a file explorer and not within the engine.
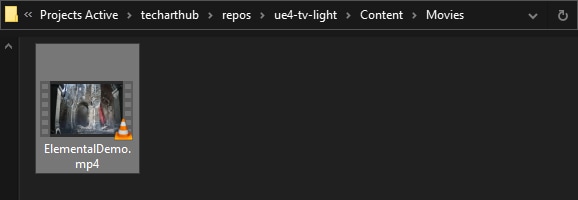
Unreal can be a little finicky about the location of media files so I highly recommend you copy the file into your Content/Movies folder. If it doesn’t exist, create it.
The engine’s Media Framework should be able to read any video file that Windows Media Player can also read, but if you run into trouble the official documentation is a good place to start looking for more information.
In this example I am using an mp4 file which is usually a safe bet.
Setting up the Media Player
Once your video file has copied into the project, jump into the editor and create a new File Media Source asset via the Content Browser. This will act as a reference to your video file so other assets in the Content Browser can read from it.
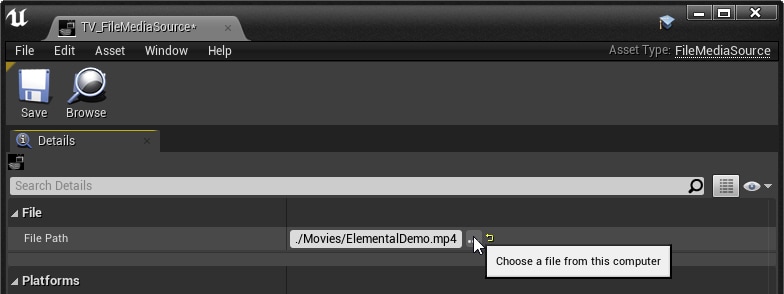
Within the File Media Source asset, click the ‘…’ button and guide it to your video file. It should automatically start within the Movies folder so it shouldn’t be hard to find.
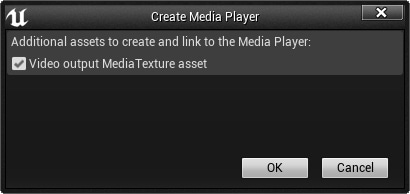
Back in the Content Brower reenter the Create Asset menu and create a new Media Player asset. Upon creation it’ll ask if you want to create an additional Video output Media Texture asset. Check that box and hit OK.
The three media assets that result are all we’ll need for video playback: A File Media Source that will dictate which file to play, a Media Player which acts as a container for a specific instance of that source, and a Media Texture to which the player will output. I named mine TV_FileMediaSource, TV_MediaPlayer, and TV_MediaTexture respectively.
We’re done with media assets now, but at this stage if you’d like to double check that everything is working correctly you can open up your player asset and double-click your File Source from the list. This will automatically open and start playing the file and you’ll be able to see that reflected in both the player and the texture. This works in the editor, so you should see your texture changing in the Content Browser. Pretty neat!
Creating the TV screen Material
Now we have our Media Texture we’ll need to add it to a Material so we can apply it to geometry in the world. Use the Content Browser to create a new Material asset. I called mine M_TVScreen.
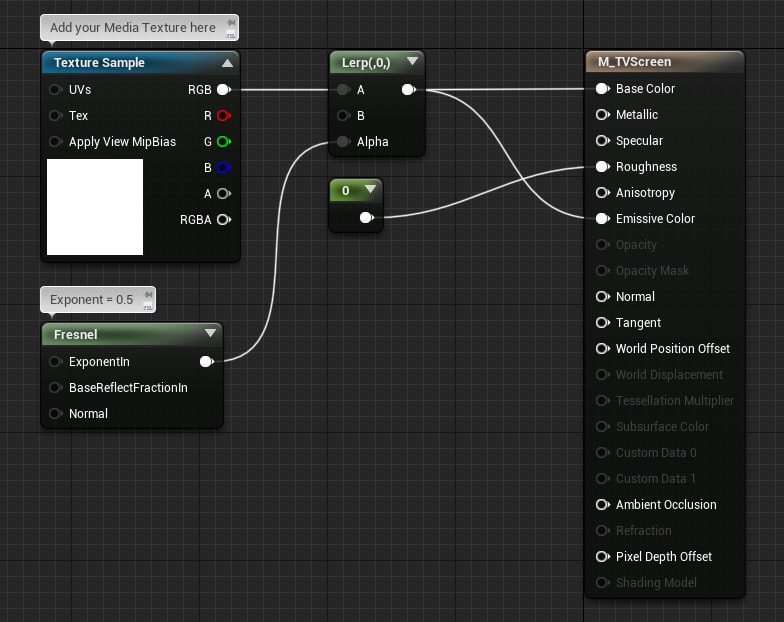
There isn’t anything fancy going on in this one. I am using a Fresnel node with an exponent of 0.5 to softly lerp between our Media Texture and black, which is just an easy way to reproduce that darkening effect you might see when not looking at a digital display from its optimal viewing angle.
I also set the Material’s roughness to 0 so when the screen is darker it’ll reflect the environment.
Jumping into Blueprint
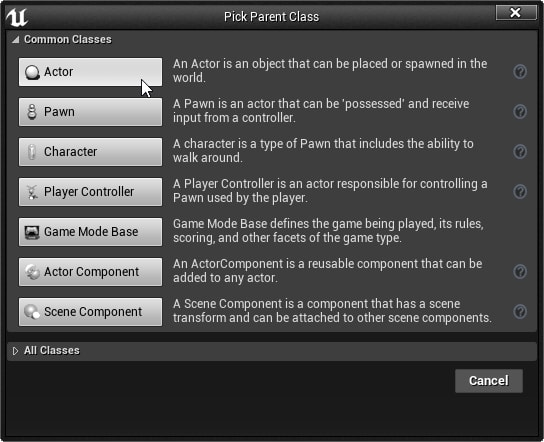
From within the Create Asset menu in your Content Browser create a new Blueprint Actor. What we want is an empty actor that we can place in the world, so when prompted to pick a parent class select Actor from the top of the Common Classes menu. Name your new Blueprint (I called mine BP_TV) and open it up in the Blueprint Editor.
The first thing our TV needs is a screen, so we’re going to select Plane from the Add menu to add a new Plane Component. It will come in facing upwards, so you’ll need to rotate the plane by 90 degrees in the X axis to get the TV screen sitting vertically.
You’ll also need to scale it to match the aspect ratio of your video file. If your video uses the standard 16:9 aspect ratio you can scale your mesh in Y by 0.565 to get the right height.
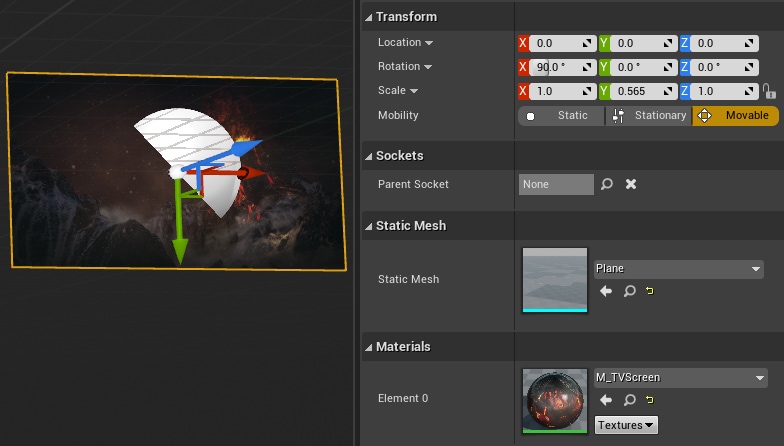
Apply your TV_Screen Material to the mesh. If you’re unsure you’ve done everything correctly you can double check the scale and rotation of the plane by running your Media Player and having a look in the viewport. Remember to make sure your video isn’t playing upside down!
If you want your video to play with audio you’ll also need to assign your Media Player asset to a new Media Sound Component. The audio will automatically start playing and sync to the player.
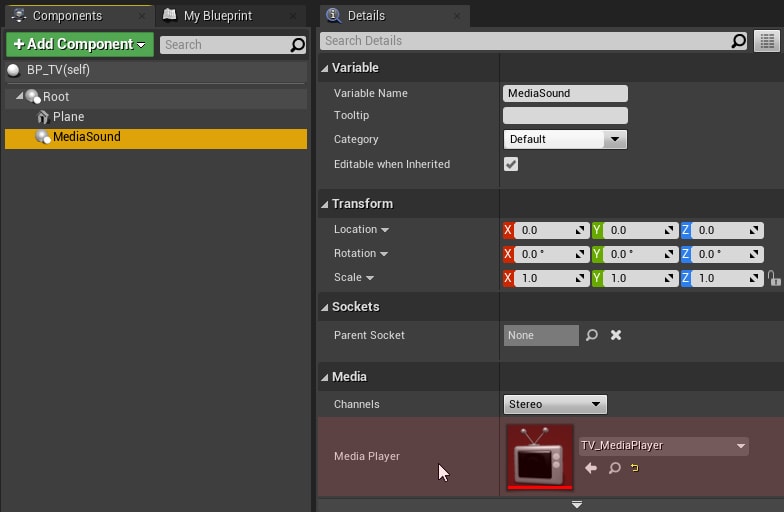
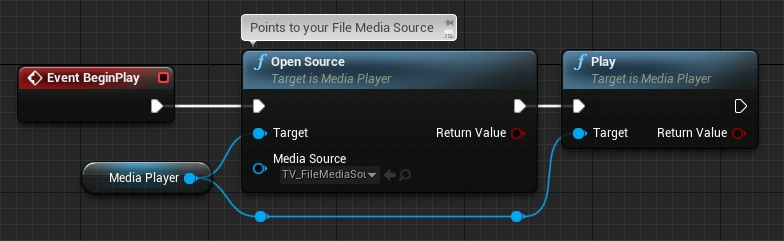
The last thing we need to do in this Blueprint for now is set up the Media Player to automatically load and play the video when the game starts. To do this we’ll need a reference to the Media Player itself, so make a new Media Player variable and point it to the Player asset.

Now we can set up a little bit of logic to make it play. The following short graph will fire off when the game begins, and will first load then play the Media Player you have referenced.
The Movie Barcode
A Movie Barcode, popularized by moviebarcode.tumblr, is a generated image that consists of a series of vertical bands of color. Arranged sequentially, each of these bands represent a single frame of a video file.


generated from the Indie Game: The Movie trailer on YouTube.
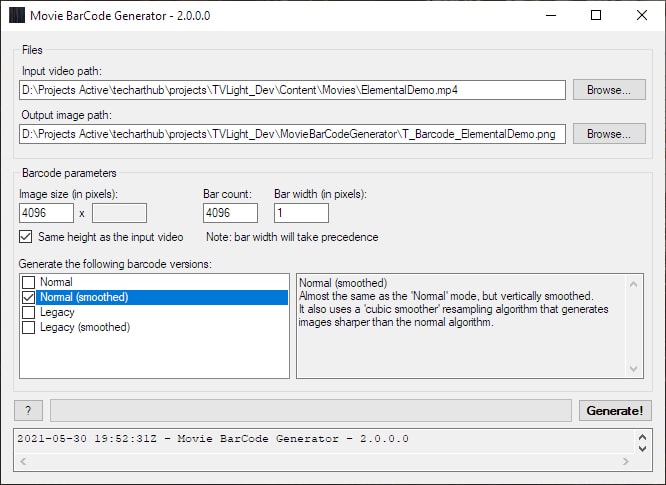
You could theoretically use any image editing software to make your barcode, but I highly recommend using Melvyn Laily’s Movie Barcode Generator, which comes with a lot of configurable parameters to generate the image for you. It’s such a cool little program.
Once you’ve downloaded the generator the first thing you’ll need to do is guide it to both your video file and where you’d like to output the resulting image. Then you’ll need to decide on how big you’d like to make your barcode. This is really important as the width of your image will define the detail and accuracy of your TV lighting. If your video file has a lot of abrupt changes in color or intensity then you’ll need to use a higher resolution to keep things in sync.
Luckily for us the texture’s height doesn’t matter, and creating a 4k+ texture that’s only 1-pixel high isn’t likely to break our texture budget. I’ve decided to make mine 4096, because 8192 seemed a little excessive. I was sorely tempted, though.
accurate you might consider making your barcode’s width the same as the number
of frames in the video, so each frame is represented.
The barcode version we’re looking for is Normal (smoothed), although it doesn’t matter too much if your pixel height is 1 since there is nothing to smooth. I highly recommend playing around and checking out the different effects you can create.
When you’re happy with your barcode jump back into Unreal and import it as a texture. Unreal will treat it as an uncompressed B8G8R8A8 texture, but as it’s only 1 pixel high the size should be managable.
Now you’ve generated your barcode you should be able to get a really good idea of the kind of light and color you’ll see from the final effect. If you’re not seeing much contrast in your barcode the lighting will be a lot more subtle. If the generator isn’t giving you the results you want, you can always non-destructively adjust the image in the Texture Properties Editor.
Creating the TV light Material
It’s almost time to create our Light Function, but before we do we’ll need to quickly create a Material Parameter Collection asset. An MPC provides a place to store common values that any Material can reference, and we’ll be using it to communicate between our Material and TV Blueprint.
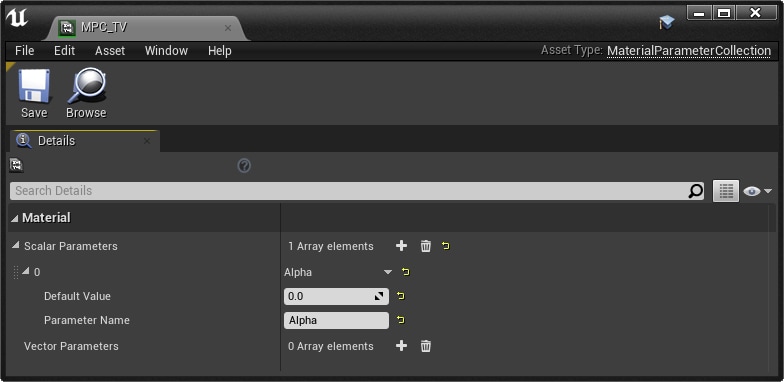
Inside the Material Parameter Collection I’m going to create a single scalar parameter called Alpha. Our Blueprint is going to write to this value, and the Light Function is going to read from it to find out how far into the video we are. Alpha will be normalized, so 0 will always be the start of the video and 1 always at the end.
Here is our Light Function Material. I’ve called mine M_TV_Light.
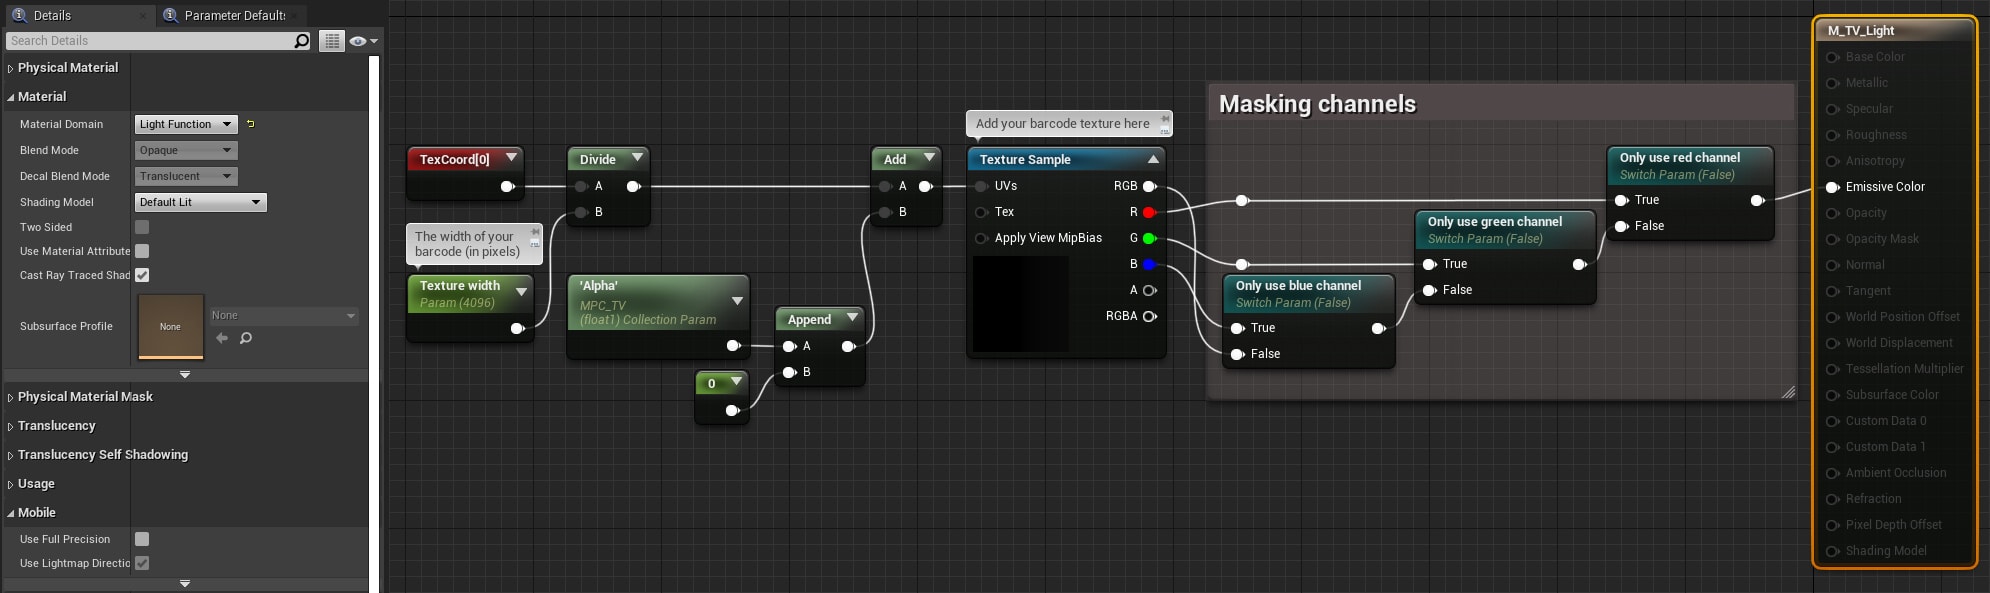
This Material will divide the UV coordinates of your plane by a scalar value which you should set to the width of your texture in pixels. This results in a very zoomed in view of your barcode where one pixel fills the entire space. If this value is not the same as your barcode’s width the animated lighting won’t sync to your video, so make sure to double check if you start having issues later on.
From here we are adding the Alpha value from our MPC to the U coordinate value which will let us scroll the texture horizontally. The value will now dictate where in the barcode the playhead is sitting. As it goes from 0 to 1 so will the barcode scroll from start to finish.
In the Material’s properties don’t forget to change the Domain parameter to Light Function or you may get weird results.
This last section of the graph is optional and only important if you want your dynamic TV light to be in color. If you’re using a greyscale (or close to greyscale) barcode you can plug your texture sampler straight into Emissive Color and skip to the next section.
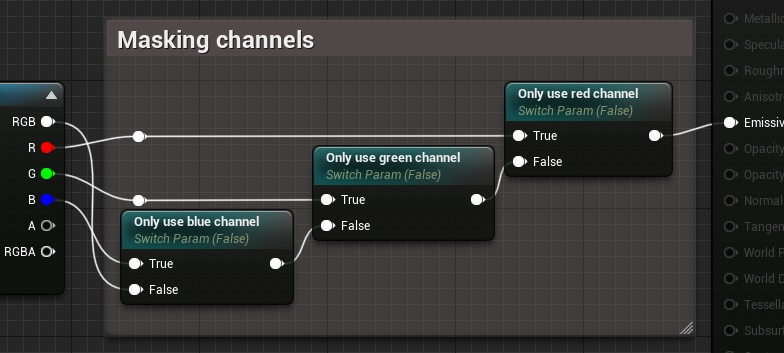
These three nodes are static parameters that can be toggled on/off within instances of this Material. We’re using them to work around a Light Function limitation that complicates our effect a little bit: Light Functions can modify a light’s intensity, but not its color.
To work around this problem we’re going to be splitting the three color channels of our barcode into three different Material Instances, and use three different lights to recombine them to create our final colored lighting effect.
To do this we’ll need to create three new instances of M_TV_Light, one for each channel.

That’s all the assets we’ll need. We’re finally ready to put it all together and create some lights.
Adding Rect Light Components
Back in the BP_TV Blueprint create a Rect Light Component for each color channel (unless you’re using a greyscale barcode, in which case you’ll only need to create one).
The color of each of these lights will need to be 100% of their specific color value (either red, green, or blue) to blend correctly.
| Color | RGB | Hex |
|---|---|---|
| Red | 1,0,0 | FF0000FF |
| Green | 0,1,0 | 00FF00FF |
| Blue | 0,0,1 | 0000FFFF |
Play around with the Intensity, Attenuation Radius, and Source Width/Height to get the best results for your environment. Remember these can be changed later (and at runtime!)
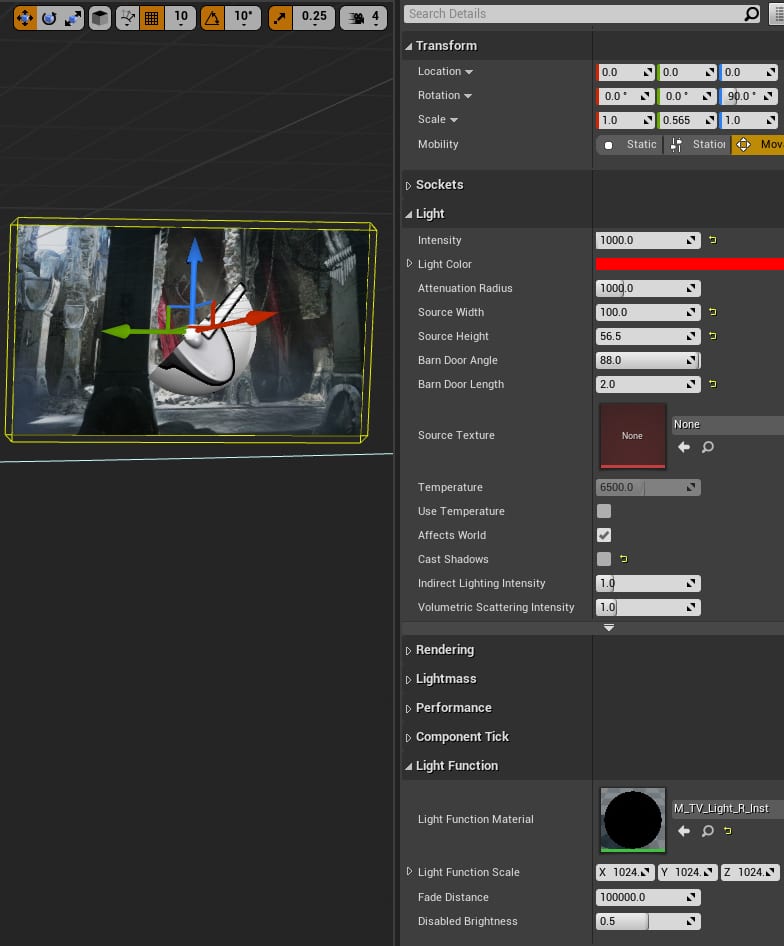
Don’t forget to apply the appropriate Light Function Material Instance!
Casting shadows
You might have noticed I’ve unchecked Cast Shadows on my Rect Lights. This is because realtime shadows are very expensive and having three shadow casting Rec Lights in the same place is absolutely overkill. If you want your TV screen to cast shadows I would recommend either:
- Enabling Cast Shadows on just one of your colored Rect Lights. The big drawback here is that depending on the colors in your barcode, this may mean that shadows are sometimes not cast if that color isn’t present.
- Create a fourth Rect Light/Material Instance (with no masking) for shadow casting purposes. This naturally adds an additional light which has an associated cost. Remember to make the new light’s color white.
Hooking the Media Player up to your Materials
All we need to do now is get our Media Player communicating to the Material Parameter Collection we created. This is achieved with the following logic in your BP_TV Event Graph.
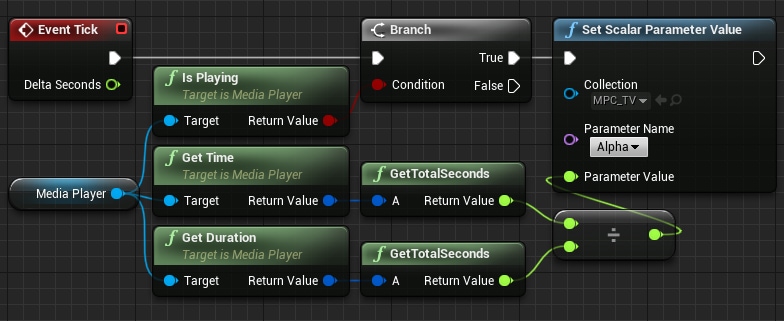
Each Tick this code will check to see if your Media Player is playing, and if it is it will then find its normalized position in the timeline and feed that into our MPC so our instances can update their barcode position.
Keep in mind
I am firing off this logic every single tick because I’m being lazy. In an actual production environment I would recommend not using Event Tick if you can at all help it. Even firing this code every second frame will half its impact on performance with minimal noticeable impact.
Hit play and you should now see the result of your finished TV Lighting setup. Nice one!
Final thoughts
It’s important to remember that this implementation of a dynamic TV light is only going to give you an approximation of the color on screen, and can only support one tone per pixel.
As the Movie Barcode Generator will average the color values of each sample frame, it may not always give you the results you’re imagining. For example, if one half of the frame is red and the other is blue, the output color will be purple.
That said, it’s a cheap effect and it looks pretty cool. Thanks for following along, I hope you found it useful.