This beginner-level Unreal Engine tutorial will show you how to make a simple Distance Measurement Tool using Blueprint. It’s my hope it’ll also serve as a good general introduction to making your own tools with the editor as well. Little gadgets like these can really speed up your workflow and make life a whole lot easier for you and your team.
My focus today will be on creating a simple actor that can measure the distance between user-defined points in space. As I’ve found many of the alternative tools on the Marketplace to be over-designed and/or clunky, I want my tool to be practical and uncomplicated.
Download the Unreal project
For those already familiar with Blueprint and just want to see how the Measuring Tool works, you can download the project for free from my GitHub. If you’re looking for the Unreal Engine 4 version, you can find that here!
How it works
The Distance Measurement Tool is spline-based, and includes a few Blueprint functions that let you adjust the spline to get the distance between two or more points in space.
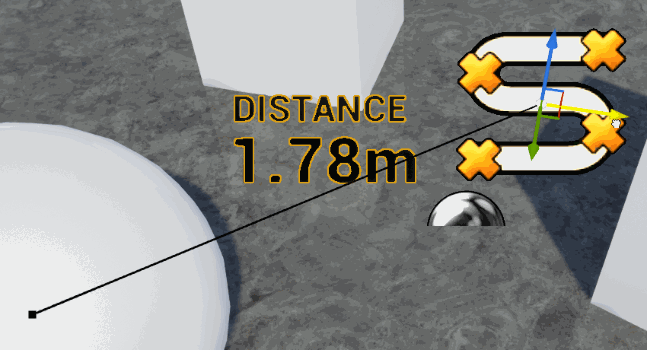
To use it, drag-and-drop it into your scene. You can change the end point by moving it around like you would any other spline component. The length value will automatically update. You can add additional points by holding alt and moving the transformation widget.
User variables
There are a few ease-of-use functions which can be found in the details panel under the Config heading.

| Setting | Description |
|---|---|
| Reset Tangents | Resets all spline tangents back to their default values. |
| Zero-Out Tangents | Sets all spline tangents to zero. This is useful to quickly remove all spline curvature. |
| Unit Type | This setting gives you the option to change the unit of measurement the tool uses. By default it’s set to centimeters. |
| Anchor Actor | If this value isn’t null the end of the spline will lock to the actor specified here. |
That’s it! Pretty simple, and it will work both in the editor and at runtime.
Let’s get started.
Project setup
We’re going to start by making a new Unreal Engine project. For this tutorial I’m using version 4.26, but it should work for earlier/later versions as well.

I’m going to create an empty Blueprint-only project this time, you won’t need any C++ for this. I’m going to also add the Starter Content purely so I have some props to test with that are more interesting that a couple of cubes.

Once we’re up and running the first thing I’m going to do is make a new folder in the root of my Content Browser called MeasuringTool. I’m going to make sure all of the assets I create for the tool stay within this folder. This is really important as I plan to migrate these files to several of my projects going forward, and I don’t want these files to get mixed-in or conflict with already existing assets.
Unit types
The first thing we’re going to make inside the MeasuringTool folder is an enumeration (or enum) called EUnitTypes. This is how we’ll be able to set what unit of measurement you’d like to use.

Text Material
Before we start our Blueprint we need to make a new Material asset for its text readout component. This Material will be a close copy of the text render Material Unreal uses by default, but we’re modifying it to always face the camera. This step could be done at any time (or even skipped, really) but it’s best to get it out of the way now.
We could create this from scratch, but since the focus of this tutorial isn’t material creation let’s take a shortcut. In your Content Browser’s view options there is a checkbox marked Show Engine Content. With that enabled, run a search for DefaultTextMaterialOpaque.

We don’t want to modify this Material (directly altering engine content is nearly always a terrible idea) so right click and make a duplicate. Name it something sensible (I called mine M_TextMaterial_CameraFacing), and drag it into your MeasuringTool folder. We’re going to make two quick changes.

Firstly, plug the Vertex Color output into Emissive Color so the text will be visible even in low-light conditions.
The second change will be to create an AlignMeshToTheCamera function and two vector3 values. This function will alter the vertices of the mesh its applied to so it it always faces the camera. The default settings will make it present the mesh at the wrong angle, so we need to tweak it a little.
Plug your vectors into Custom Object Basis 2 & 3 (1 can stay default), and set them to (1,0,0) and (0,-1,0) respectively. What this does is switch the (now inverted) Y and Z axes to change the aligned rotation so we can read the text properly.
You can close the Material now, we won’t need to come back.
Creating the Blueprint and adding components
Now you’ve got your enum and your text Material it’s time to create a new Blueprint class. We’re going to select Actor as its parent class because we want it to be a simple object with a transform that we can drag and drop into the scene. I named mine BP_MeasuringTool because I’m super creative.

Open up your new Blueprint and add the following components:
- Spline
The length of the spline component is what the tool will measure. We will be making a few functions that will define where it starts and ends. - Text Render (x2)
We need Text Render Components to output the distance value of our spline in a legible format. Name one of these Value, and the other Distance. - Billboard
The Billboard Component isn’t strictly necessary, it’s just for show. That said, it helps pick out the Measuring Tool from the background, and makes the whole thing look a little more slick.
When you’ve added the components, click and drag the billboard to the top of the hierarchy to make it the parent component of your actor, and likewise parent your Distance text render to Value. Your Blueprint layout should look like this.

Component settings
Billboard
You can set your billboard sprite to anything you like, as it’s purely an aid to identify the Measurement Tool even if it’s partially obscured. If you’re feeling particularly artistic you might consider creating your own.

I found that the sprite texture T_Loft_Spline was a good fit for me. It’s an engine texture so to see if you’ll have to keep Show Engine Content enabled. Don’t worry about this file sitting outside your content folder, since it’s an unchanged engine asset Unreal will know where to find it.
Spline
The only setting you’ll need to change here is to check the box to Input Spline Points to Construction Script. This is important because exposes the spline point data to the construction script. Without that our tool won’t update correctly in the editor.

Text Renders
Both of your text render components should have our new M_TextMaterial_CameraFacing Material assigned, and both horizontal and vertical alignment set to center.
Set the Distance text value to DISTANCE, set its World Size to 16, and add 22cm in the Z axis so it sits above its parent. This is all we’ll do with this component as it’s just for legibility.

The Value text render’s position and text value will be set programmatically so it can stay where it is, but set its World Size value to 26.

Updating the distance value
Jump back into your Blueprint graph and create a new EUnitTypes variable. Name it UnitType. This will be one of the variables that you’ll use outside the Blueprint editor, so click the eye icon to make it public and put it in an easily identifiable category. I like to use the term Config for these kinds of variables.

Next, create a new function called UpdateText. This will set the position and value of our Value render text component based on the length of the spline.

Fire this function from both your Construction Script and your Event Tick so it works inside the editor and at runtime.

Keep in mind
I am firing off this logic every single tick because I’m being lazy. In an actual production environment I would recommend not using Event Tick if you can at all help it. Even firing this code every second frame will half its impact on performance with minimal noticeable impact.
If you drag and drop BP_MeasurementTool into your scene now you’ll be able to move your spline around and create new points, and the text will automatically update its value based on the unit type you have set in the Blueprint’s Details panel.
Tangent control
Splines can be fiddly. The next thing we’re going to add is some functionality that will let us set all of our tangents with a single click. To do this we’ll need three new functions inside our Blueprint.
The first is SetTangents which will simply loop through all of our spline’s tangents and set them to a specified vector input.
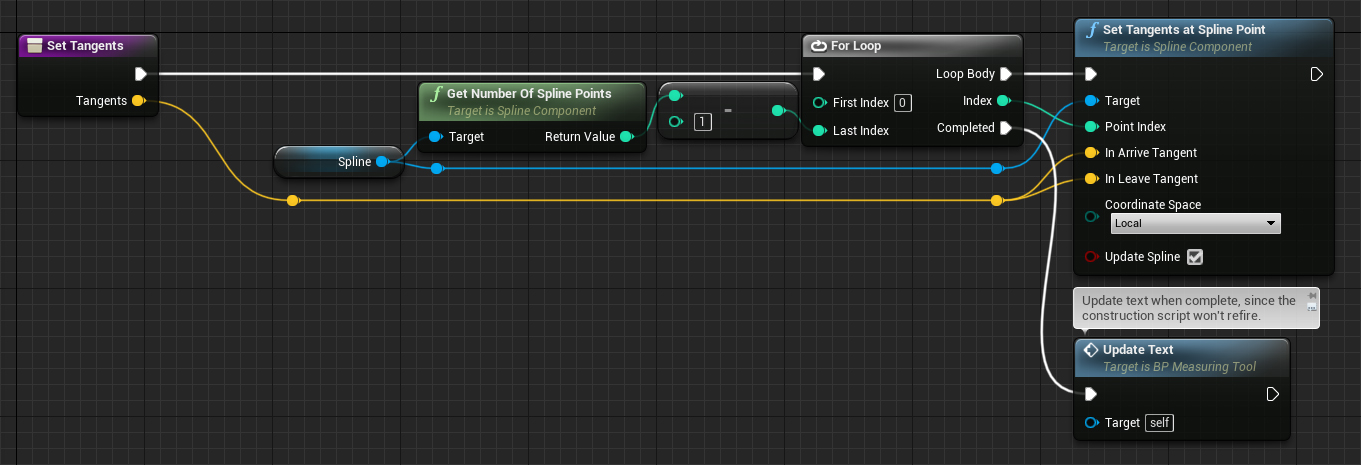
The last two are very similar, I’ve called them ZeroOutTangents and ResetTangents respectively. Each one will fire SetTangents with a different input – the former setting all tangents to 0,0,0 (no curvature) and the latter to the spline’s default value of 100,0,0.

These are the functions we’ll fire in the editor, so assign them to your Config category and make sure both of their Call in Editor checkboxes are ticked. This will turn them into buttons in your Blueprints details panel.

Snapping to Actor
The last bit of functionality we’re going to add to our Measurement Tool is the capability to snap the end of our spline to an actor’s location. To do this we’ll need one last variable in our Config section, a reference to an actor. I called mine AnchorActor. This is another one we’ll tweak per-instance, so remember to set it to publicly editable.
Create a new function called SnapToActor, and add it to both your Construction Script and Event Tick. Make sure it fires before your text update function or the readout will be out of date!

The SnapToActor function is simple. It looks to see if you’ve assigned an actor, and if so it will move the last spline point to its location. If your AnchorActor variable is empty, it does nothing. Easy!

Wrap up
While not having all the features of the ones you might find on the Unreal Marketplace, I hope this simple measuring tool helps you with your projects and that you find it a bit less clunky to work with.
Thanks for reading, and good luck with your projects!