In this article we’re going dive headfirst into the makeup of an Unreal Engine Master Material. Through practical example we’ll explore both the intention behind their creation and the advantages/disadvantages of using them in your projects.
A Master Material is a versatile Material template that utilizes customizable parameters to provide a higher level of utility than a standard Material setup. Through these parameters an instanced Master Material can be both easier to maintain and support a much larger range of different use cases.
In Unreal Engine Master Materials can range in scope and complexity. From smaller graphs with few parameters to monolithic graphs with dozens of nested functions, there is a lot of ground to cover. In this article we’re going to have a look at when each is best applied and why it’s important to pick the right Master Material for the job.
We’re also going to explore a practical example in one of the Master Materials I use most regularly, a physically based Material that I use in almost every one of my projects.
If you’re interested in using this Master Material within your own projects, you can follow this link to download the sample project from my GitHub. Feel free to use it however you like. I hope you find it useful!
Before we get too much further into the specifics of what this material does, however, I think it’s important to briefly cover the how and the why.
What is a Master Material?
A Master Material is a series of interconnected shader instructions and inputs, just like any other Material you might create in Unreal. The key difference between a Master and a standard Material setup is that in the former most (or all) of the inputs are parameterized.

The use of parameters allows your artists and level designers to create variations of the original through Material Instances, letting them assign their own input maps and values to suit the asset or level they’re working on. In this manner, permutations of a single Master Material can be used throughout a project for a huge range of different purposes.
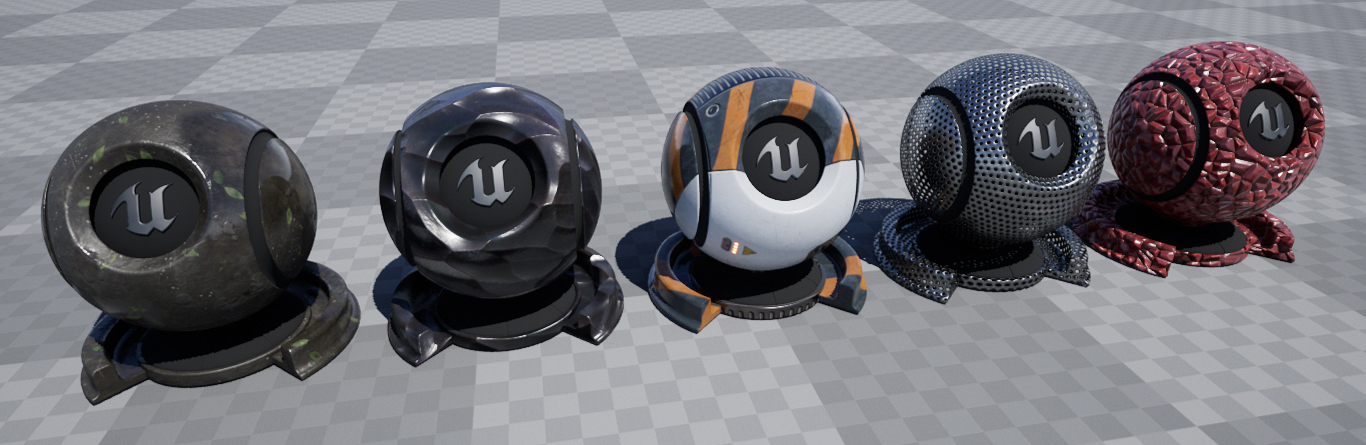
produce a range of surfaces from the same Master Material.
A well-made Master Material will maximize creative control while at the same time not exposing artists to the complex and sometimes confusing web of nodes behind the curtain. This will result in a much more streamlined art pipeline which is faster, easier to maintain, and less susceptible to human error.
Reasons to use (and not to use) a Master Material
There are a lot of reasons to utilize the power of Master Materials in your project, but unsurprisingly there are also some associated drawbacks that you need to be aware of before jumping in with both feet.
Here are some of the more common considerations.
Advantages
- Master Materials can provide artists and designers the power and flexibility of advanced material features without a deep level of Material Editor experience.
- Material Instances afford very fast iteration, and will minimize sometimes lengthy shader compilation downtime when changing values.
- Master Materials serve as a ‘single source of truth‘, where updates are propagated throughout your project automatically whenever changes are made.
Disadvantages
- The sheer amount of configurable options inside larger Master Materials can become overwhelming. This is especially true if the Material is not well documented.
- Monolithic Master Materials that try to support every single feature can become prohibitively expensive to work on.
- Any change to a Master Material will force the recompilation of every single one of its shader permutations. Even in medium sized projects this number can be in the thousands and can grind your project to a halt while it processes.
My approach to creating practical Master Materials
My methodology for developing Master Materials is simple. I want to minimize the disadvantages and emphasize the advantages they offer as much as possible. With this in mind, I am not a big fan of the ‘one size fits all’ Master Material that can do everything under the sun and takes 10 minutes to compile.
In my opinion that defeats the purpose of what a Master Material is trying to achieve. We’re trying to speed up our workflow here, after all!

There are dozens of Master Materials available online. You can find them in tutorials, free asset packs, and of course on the Unreal Marketplace. Each of these has been designed to cater to a particular need, and this is what I try to keep in mind when designing my own.
For whom, and for what purpose, am I adding this feature to my Material?
The Material we’ll be looking at today is a little different because I’m making it for you – and I have no idea about your specific project requirements. Nonetheless, I still do follow a series of my own best practices for creating Master Materials which rarely steer me wrong.
I’m hoping the following Master Material example will form a solid jumping off point from which you can design your own Masters that better suit your specific needs. As such, I’ll be trying to keep this one relatively straight-forward. Feel free to add features or tear them out as best suits you and your project. It’s been designed it to be easy to extend, so this shouldn’t be too difficult.
Using the Material
In my sample project I have called our Master Material M_Master.
This isn’t the most creative of names, and if you plan to use it in an actual project I would recommend naming it something more specific. Assume you’ll have several Master Materials in your project because you most likely will.
I have tried to design M_Master to be as painless as possible to use, and a large part of that process is respecting your performance budget. To that end, when you first open up an Instance all features except the most basic base color tint should be disabled. All you need to do is enable the features you want to use and you’re away.

The placeholder textures the Material uses are sourced from Unreal Engine’s base content so there shouldn’t be any missing file references, even in an otherwise blank project.
Creating the Material
For the rest of this article I am going to assume you have a basic understanding of Unreal Engine 4 and/or 5 and its Material Editor, but I also hope the following breakdown will be relatively easy to follow even if you’re a complete beginner. If you’re not sure about any of the Material Nodes I use, the Unreal Engine Documentation has extensive information on how materials are created and modified. It’s a great resource.
If you’re not sure something you can always reach out via techarthub, and I might be able to help. Likewise, if you think I’ve made a mistake with the Material or my approach, I’d also love to hear from you. It’s the only way I’ll improve!
That’s enough of the preamble, let’s have a look at this Material.

Not quite.
Using modular Material Functions
The first thing you’ll notice about our Master Material is that it’s constructed from a series of modular (and sometimes interconnected) Material Functions. This might seem a little strange at first, but I’ve found this method to be both incredibly flexible and powerful. Not only is it easier to compartmentalize larger graphs when they’re broken into output-based Functions, but extending/modifying the Material is so much easier.

The best way to illustrate the power of this approach is with an example:
Let’s say I’ve made my Master Material, and now I want to come back and make a variant that supports a glass-like transparency.
One option I have is to work the desired features back into an existing Material Function (in this case it would be MF_Opacity). This is a good solution if most of the use cases for that Function used glass-like transparency, but this isn’t the case so all I’d be doing is adding a lot of complexity that few of our Instances will ever use.
So instead, by taking the modular approach, I ensure that each of my Master Materials is created from the same core library of Functions, which can be used in different combinations to get the results I want – but I can extend these with additional nodes where appropriate to make more custom one-off Materials as well.
We supplement the Material Functions from our library with additional functionality where required to create the type of surface we need.
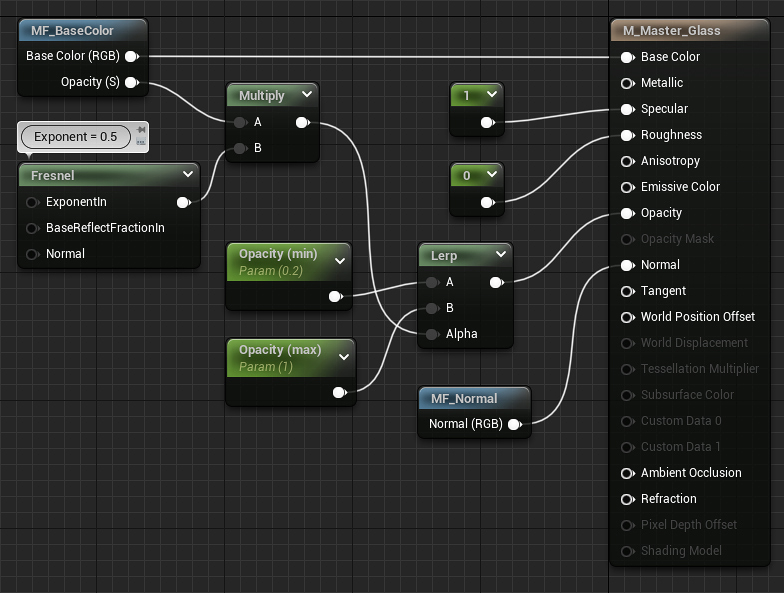

Click either of the images for a higher resolution version.
MF_BaseColor
The Base Color of your object represents the color of your material before any additional effect or modifier (lighting, reflections, subsurface scattering, etc.). It’s what you’ll see if you enable the Unlit View Mode.
MF_BaseColor is primarily made up of two texture inputs and some parameters to adjust their values. This includes a base diffuse map, an optional detail diffuse map that can be overlaid on top, and options to modify the tint, contrast and saturation of those maps.
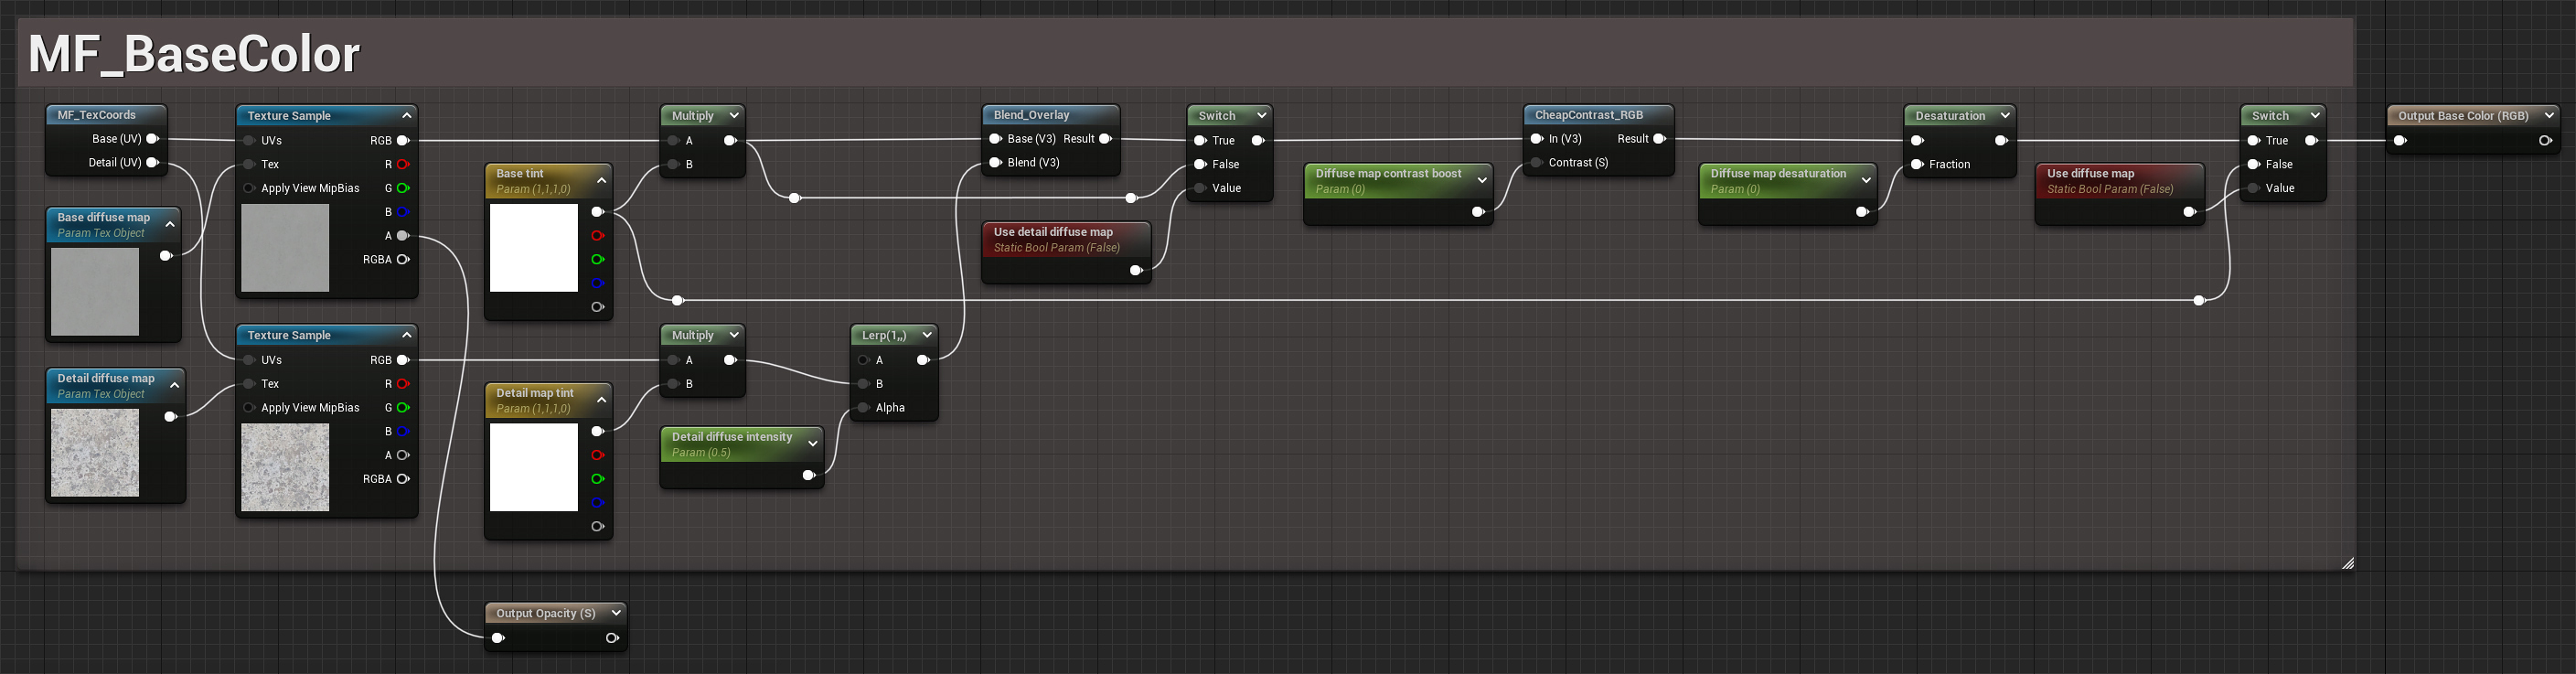
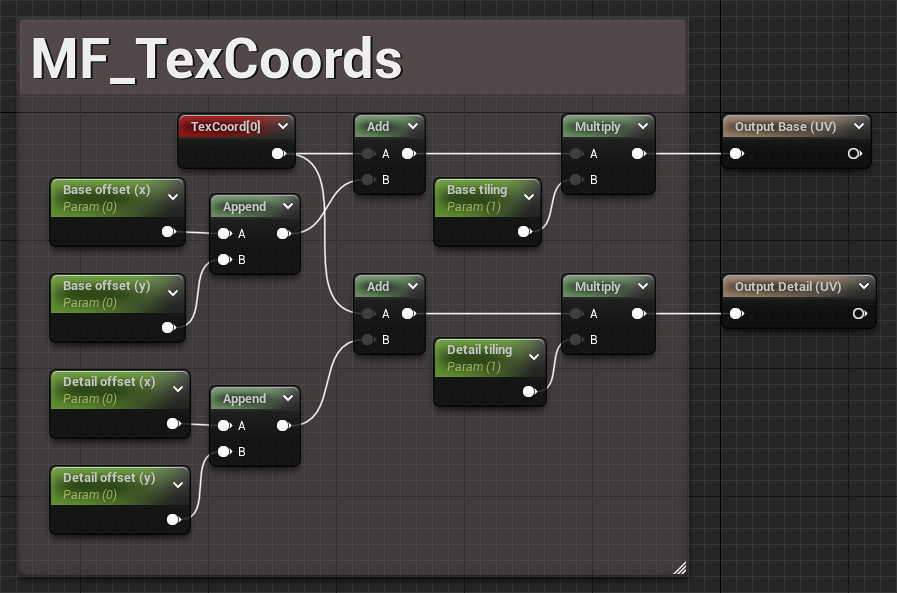
MF_TexCoords
You might have noticed that I am using a node called MF_TexCoords that generates texture coordinates for my texture maps. This is just a simple utility Function that will tile and offset a texture’s coordinates via a series of scalar values. It outputs coordinates for both a base and detail map.
These nodes could easily just sit within other Functions with no additional cost, but I prefer collapsing commonly used groups of nodes into their own unique Functions wherever possible. Some people don’t like nesting Material Functions, but I am definitely not one of them.
MF_Opacity
When making this Material, I was forced to make a few assumptions about your art pipeline. One of these is that any texture that defines the start of your opacity chain is going to be sitting in the alpha channel of your base diffuse map. This is where the Master Material is going to look for it.
MF_Opacity is very simple. It provides a minimum and maximum opacity value that act as the high and low bounds of your alpha map.

MF_Emissive
MF_Emissive will output an RGB value generated by a simple color parameter, or that same tint multiplied by an optional emissive map that uses the base texture coordinates. It is designed for emissive maps that use the same UV layout as the Base Color.
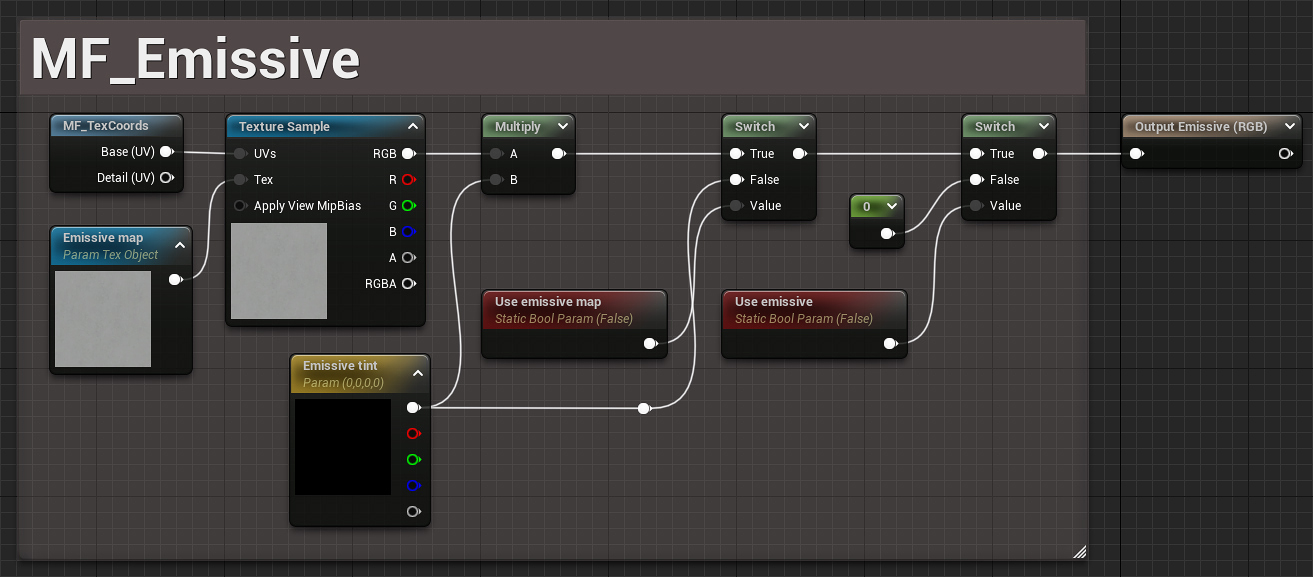
Like most of our Material’s optional features, Emissive is black (effectively disabled) by default.
MF_Normal
The Normal Material Function follows a similar line to Base Color. When enabled, you can input a base normal map and an optional detail normal map, which can blend together. The strength of each map can be configured individually.

MF_PBR
MF_PBR is broken up into three color-coded sections, as the expected texture map input is a packed RGB texture with the following channel assignations:
| Channel | Texture |
|---|---|
| R | Ambient Occlusion |
| G | Roughness |
| B | Metallic |
This is a relatively common method of packing textures for Unreal Engine. It can be found both within the sample assets that Epic provides and on the Marketplace. Remember to double check that your own source textures meet this standard. You may need to do some rearranging to get the expected result.
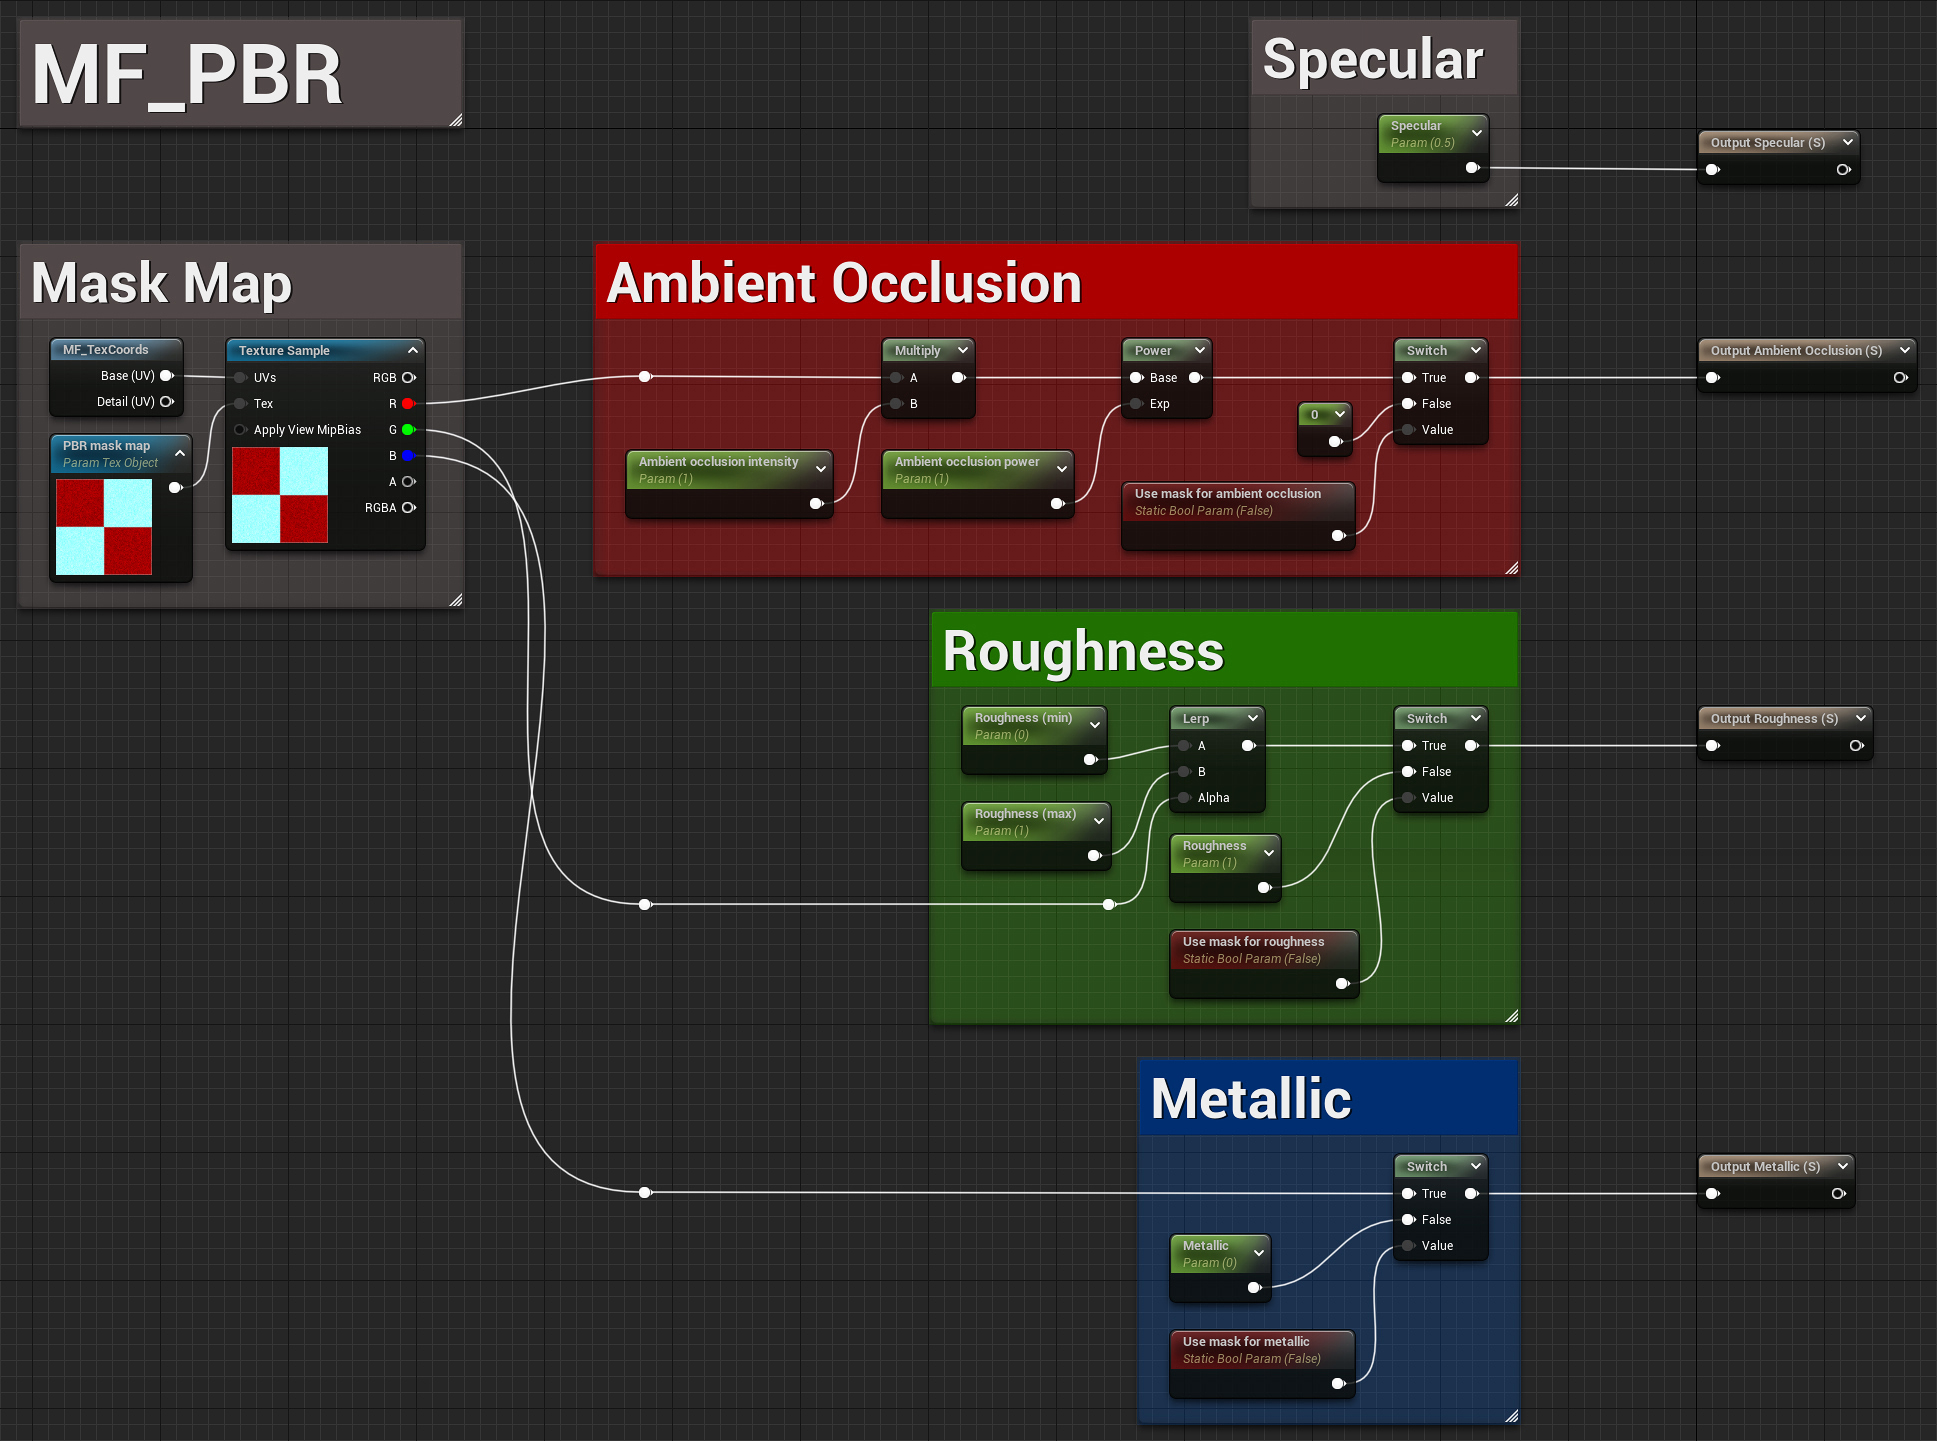
The parameters for the PBR section are relatively straight forward. They provide basic control over your metallic and specular values, and the intensity of your ambient occlusion/roughness maps.
Wrap-up
Thanks a lot for taking the time to read through my article. I hope it’s been helpful!
I like to think of this system as a bit of a blank slate. It does the basics, and provides a good place to start if you want to add some of the more complex (and more expensive) features, but where you go from here is now up to you.
If there are any particular features you’d like to see me cover in further detail, make sure to let me know. From Displacement and World Position Offset, to Refraction or Subsurface Scattering, the Material system in Unreal Engine has much more to offer and I’m keen to explore it with you.