If you’re a technical artist, animator, or visual effects artist working within Unreal Engine you’re going to love Animation Curves. Unless of course, you love them already.
Found within the Animation Editor, Animation Curves are a versatile and underestimated method of applying animation data to objects in your game world. This includes the direct modification of material parameters and morph targets, but also much more through the use of Blueprint-accessible attributes.
In this article we’re going to have a look at how Animation Curves are created (both from within the Editor and imported from external software packages like Maya and Blender), and explore some interesting use cases as to how they can be applied to your projects.
Many of the practical examples in this article will be from my latest project, a multi-part series on Creating a Halo-Style Bubble Shield in Unreal Engine 5.
What is an Animation Curve?
An Animation Curve is a customizable 2D curve that can be created and applied to a skeletal mesh animation via the Sequence Panel in the Animation Editor. The X-axis of the curve represents the position of the animation playhead in seconds, and the Y-axis provides a keyframeable float field that can be used to make runtime changes to your game over the duration of the animation.

Animation Curves are an efficient and effective way to create animation-led functionality in your game. Although the most common use case this system was designed for is the control of imported morph targets (also called blend shapes) and for the real-time modification of material parameters, Animation Curve values can be applied to almost any actor in your level.
Why should I use Animation Curves?
There are many ways to animate objects within the Unreal Engine. You could create a series of curves in a Blueprint Timeline, animate in a Material using the Time Node, jump into an Animation Blueprint if you want to get fancy, or use a combination of these techniques to get the effect you want.
With all those other options available, why then should you choose Animation Curves?
#1) Always be synchronized to the action
No matter what happens during animation playback, irrespective of dropped frames, time dilation, or intricate animation blending, values driven by Animation Curves will always remain synchronized to their respective animations.
#2) Real-time visualization within the Editor
If you’re using Animation Curves to directly modify morph targets or material parameters you’ll be able to see the effects of your curve values in the editor even if you scrub through the timeline.
This really helps visualize and fine-tune your result, and is particularly useful for VFX artists who often need to modify a range of material parameters in parallel to get the intended effect.
This in-Editor playback feature is currently limited only to Material and Morph Target Curves, which are special subtypes which we will discuss below.
#3) An elegant solution to a potentially messy problem
Animation Curves can be applied directly to vertex animation and material parameters, without the need to hook anything up in Blueprint. This means you’ll have less node clutter to deal with, and your project will be objectively easier to manage.

Appropriate use of Animation Curves will help you minimize spaghetti in your graphs, which is always a good thing.
Creating Animation Curves
There are a few ways you can create an Animation Curve. The simplest is go through the Anim Curves Panel in your Animation Editor. To do this you’ll need a Skeleton asset (most often automatically generated when you import a Skeletal Mesh), and an existing animation to which to apply your curve.
If you don’t see it, you can access the Anim Curves Panel via Window > Anim Curves.
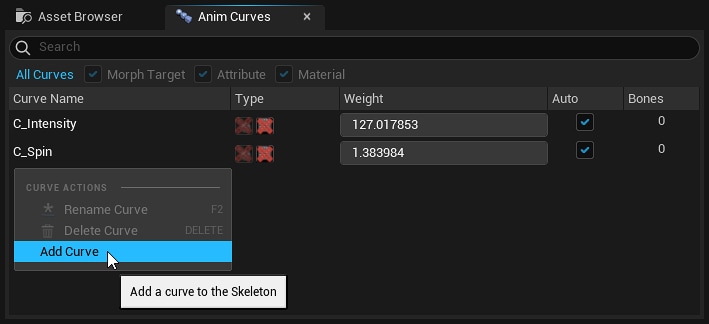
Keep in mind that data like the Animation Curve’s name and type (which we will get to shortly) are stored in the Skeletal Mesh asset, not an Animation Sequence. This means the same curve can be applied to any animation that uses the same Skeleton, and renaming/deleting it will affect all instances of them.
Importing Animation Curves
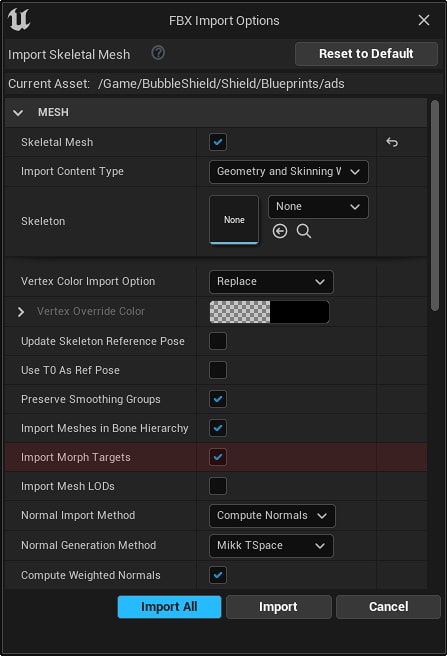
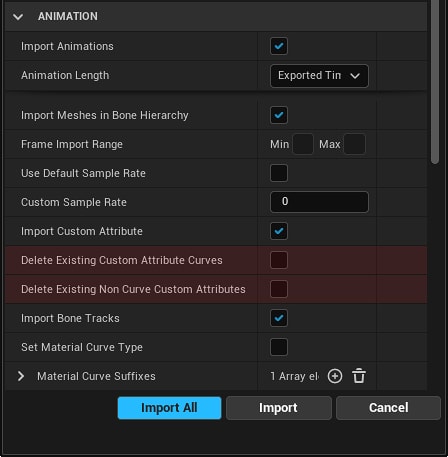
Animation Curves can also be authored in other software packages like Blender, and imported via the FBX import dialog. The most common use case for importing Animation Curves would be the creation of morph targets/blend shapes for character animation, but once the curves have been imported they can be applied to other things like any other Animation Curve.
Custom attributes can also be imported from third-party software packages, but the process for doing so will depend on which program you’re using. If this interests you, check out my post Importing Custom Attributes from Maya into Unreal for a step-by-step guide to creating your own custom animation attributes using Maya/MayaLT.
Animation Curve Properties
Each Animation Curve has properties which are used to tell the engine how to interpret its curve data. This information is stored in the Skeleton asset.

Curve Name
Unsurprisingly, this is the name of your Animation Curve. If you’re using Blueprint to fetch curve data, you’ll use this to reference a specific curve from within your node graph.
Type
Unreal provides three different types of Animation Curve, but they’re not mutually exclusive. A single curve can be multiple types and used in a variety of different ways. You can change the type of your curve by clicking on the icons in the type column.
Your Anim Curves list can be filtered by type. This is mostly useful if you have a large amount of Morph Target Curves which just flood the Anim Curves list and make it harder to find the one you’re looking for.
Attribute Curves
An Attribute Curve is an Animation Curve which contains data that can be accessed and read from Blueprint using the ‘Get Curve Value’ node, located in the Animation Instance of the Skeletal Mesh.

If an Animation Curve is assigned to an Animation Sequence (and therefore has animation data attached) it is automatically considered an Attribute Curve, irrespective of how its used.
Morph Target Curves
Morph Targets (or Blend Shapes if you’re coming from Maya) are a type of mesh deformer most commonly used in character animation and specific kinds of VFX work. This type of curve can’t be created within the engine and must be imported with your Skeletal Mesh.
Material Curves
As the name suggests, a Material Curve is the Animation Curve type that will communicate directly with your Materials, even from within the Editor.
A Material Curve will look through each of the Materials assigned to your Skeletal Mesh for a parameter that shares its name. Each time your animation updates, it will assign its float value to that parameter.
This will work even if you have multiple materials assigned, just as long as the parameter and curve name match.
Weight
This slider provides real-time feedback as to the current value (or weight) of your curves. If the Auto checkbox is checked, the weight value will automatically change as your animation plays.
If you want to change the weight of your Animation Curves manually in the Editor, you can drag along the slider or left click to input a value manually. Taking manual control of your curve will uncheck the Auto checkbox.
Bones
Animation Curves can be assigned to specific bones in your Skeleton. This can be very useful for optimization, as if that bone is removed (using Skeletal Mesh LODs, for example) the animation data will also be culled.
The Bones value in the Anim Curves panel is a read-only indicator of how many bones in that Skeleton have been assigned to that Animation Curve.
For more information, check out this page in the documentation.
Working with Animation Curves
Alongside the Anim Curves panel we’ve just covered there are two others within the Animation Editor that you’ll need to be familiar with if you want to work with Animation Curves.
Animation Sequence Panel
Whether you’ve been animating within the Editor or you’ve imported animation data from another source, an Animation Sequence is where your keyframe information is stored. You can access this panel by double-clicking on an an animation asset from the Asset Browser tab in the Animation Editor, or from within the Content Browser.

It is here that you can add/remove Animation Curves to/from your Sequences. Curve information will be listed in the dropdown for each curve. You can also create new curves from here using the Curve menu dropdown.

Curve Editor
The Curve Editor is where you can modify your Animation Curve’s keyframe information. You can access it by double-clicking one of the curves from the list in your Animation Sequence Panel.

Just like any of the other curve editors within Unreal (like the Blueprint Timeline or Curve data assets) you can right click on the curve’s path to create a new keyframe, and drag keyframes around to retime your animation.

Check out this page of the Unreal Engine Documentation for more information on how you can get the most out of the Curve Editor.
Animation Curves and Blueprint
One of the most exciting features of Animation Curves is that their values can be accessed through Blueprint and applied to almost anything.
This can be used to control VFX set pieces or to animate a prop your character is holding, but the same values could be applied directly to your gameplay logic as well. For example, the fire rate or damage of a weapon could be directly controlled by the state of its animation.
Or, in the case of my Bubble Shield project, the scale of the shield actor itself and a volumetric fog material’s extinction value is being modified by the Bubble Shield’s deployment animation.

Final Thoughts / Tips & Tricks
Thanks for taking the time to read through my article on Animation Curves! I hope you also see their potential and will find way to utilize them in your own projects.
If you’re interested in checking out a project which showcases how they can be used, I highly recommend having a look at my ongoing series Creating a Halo-Style Bubble Shield in Unreal Engine 5, in which I use animation curves in a range of different contexts.
I’d like to leave you with some of the miscellaneous tips and tricks I’ve discovered while creating the Bubble Shield project. I hope they help jump-start your own exploration into the potential of Animation Curves.
- If an Animation Curve is not being used it will be greyed-out in the Anim Curves panel.
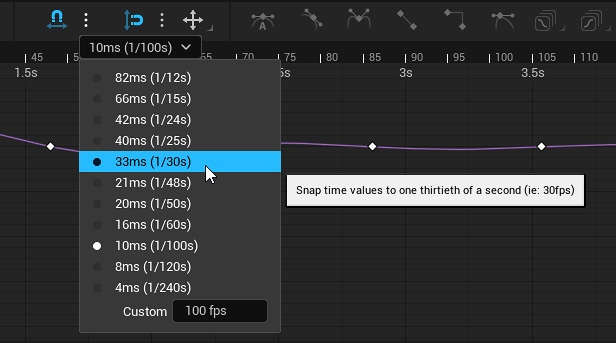
- If you want to make sure all of your keyframes are not sitting on fractions of frames in the timeline, make sure you set the time snapping options to match the same frame rate as your animation. This will make sure when you drag your keyframes around, they will always match the existing animation’s frame positions.
- Curve values are not normalized, so if you change the timing of your animation and re-export it, your curves will be unaffected.
- If you’re going to import Animation Curves from another program and then modify them in the Curve Editor (like I did), be careful that your import settings so you don’t accidentally wipe that data when you re-import the asset (like I sadly did.)
For more information on export/import settings for Animation Curves – check out my article Importing Custom Attributes into Unreal from Maya.
- In the Animation Sequence’s Curves dropdown menu, there is an option called Show Curve Keys. I found this particularly useful for when I had multiple curves and I wanted to get a better overview of their keyframe positions.
- Renaming Animation Curves that are currently being used by any of your Animation Sequences can get a little messy. Unreal will need to load each Sequence and Pose asset that uses the curve, and at the end of the process it will leave the old curve behind in your Anim Curves panel.
Additionally, for me at least, excessive renaming was a good way to crash the Editor.