Thank you for taking the time to check out Competitive Recoil. On this page you’ll find a breakdown of each of the Blueprints contained within the project, how they’re intended to be used, and how you can integrate them into your own game.
Need help?
If you have any questions or concerns you may find them addressed in the Frequently Asked Questions section at the bottom of this page. If you don’t find what you’re looking for, you can reach me at nick@techarthub.com and in the techarthub Community Discord server.If you’re looking for the documentation for previous versions of Competitive Recoil, you can find them here.
Table of Contents
BP_RecoilComponent
The Recoil Component contains the logic for equipping, shooting, and reloading weapons, as well as for calculating shot trajectory and animating the camera to simulate the recoil. As you can imagine, this one does most of the heavy lifting.
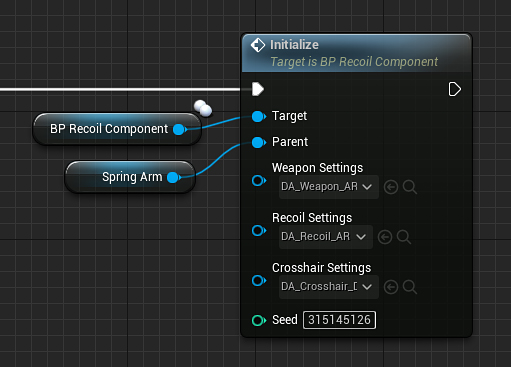
Intended to be added to a Pawn with a Camera Component, this Blueprint won’t activate unless Initialized with valid Weapon, Recoil, and Crosshair settings. Each of these is contained with their own Data Asset, making it very easy to create a wide range of weapons with different recoil parameters.
The project includes a number of sample weapons/recoil configurations to get you started.

Parenting to a Spring Arm Component is optional but recommended!
This Blueprint adds several additional Components to your Pawn and places them in a specific hierarchy to assist with the recoil animation:
- DummyComponent (a dummy Scene Component, it always helps to have an extra transform!)
- KickbackComponent (handles the kickback part of the recoil animation)
- PatternComponent (handles the pattern part of the recoil animation)
- KickbackComponent (handles the kickback part of the recoil animation)
- FullAutoSound (an Audio Component that plays a looping sound when firing your weapon on full auto)
Side note
I decided to keep the Weapon and Recoil settings in separate Data Assets because I anticipate you have your own weapon setup that you’d like to integrate into Competitive Recoil. It shouldn’t be difficult to replace any or all weapon values with your own logic without affecting recoil calculation.
Sample Curves
| Name | Description |
|---|---|
| Curve_AR_Vector | Sample recoil pattern (Assault Rifle) |
| Curve_LMG_Vector | Sample recoil pattern (Light Machine Gun) |
| Curve_SG_Vector | Sample recoil pattern (Shotgun) |
| Curve_HeavyKickback_Float | An animation curve for heavy kickback with some oscillation |
| Curve_LightKickback_Float | An animation curve for light kickback, best used with rapid-fire guns |
Settings
All of Competitive Recoil’s functions and variables have been given internal descriptions, but if something doesn’t make sense you’re probably not the only one, so please let me know!
Weapon
| Name | Description |
|---|---|
| NiceName | The name of the weapon that’s presented in the interface |
| MaximumRange | The maximum distance for impact calculation |
| bIsAutomatic | Will this gun keep firing if you hold the trigger down? |
| FireRate | How many times this gun shoots per second |
| MagazineSize | The maximum number of times this gun can shoot before needing to be reloaded |
| NumberOfProjectilesPerShot | How many projectiles are fired with each shot |
| bUseSeedForPerProjectileDeviation | Should the random seed be used when calculating shot spread? If false the outcome will not be reproducible between shots. |
| MaximumPerProjectileDeviation | The maximum random deviation for each fired projectile. Only useful for guns that shoot multiple projectiles per shot. |
| ReloadTime | How long in seconds this weapon takes to reload |
| CrosshairOffset | A per-gun crosshair offset to help differentiate between more and less accurate weapons |
| EquipCue | The sound that plays when this gun is equipped |
| SingleShotCue | The sound that plays when this gun is fired once |
| FullAutoCue | The looping sound that plays when this gun is being fired on full auto |
| TailCue | The sound that plays when the gun stops firing on full auto |
| DryfireCue | The sound that plays when the gun is fired and the magazine is empty |
| ReloadCue | The sound that plays when the gun has finished reloading |
Recoil
| Name | Description |
|---|---|
| KickbackCurve | The name of the weapon that’s presented in the interface |
| KickbackStrength | The strength of this gun’s kickback animation. This is reflected in the intensity of the camera movement. |
| KickbackDuration | The duration of this gun’s kickback animation |
| bUseSeedForPatternSpread | Should the random seed be used when calculating pattern spread? If false, the random pattern spread will be different each time. |
| PatternCurve | The maximum random deviation while firing in a pattern. This gets more pronounced the longer you fire. |
| PatternDeviation | How many projectiles are fired with each shot |
| PatternResetDuration | How long before the recoil pattern resets after we stop shooting |
| bUseSeedForMovementSpread | Should the random seed be used when calculating movement spread? |
| MovementDeviationWalking | The maximum random deviation while moving |
| MovementDeviationJumping | The maximum random deviation while jumping/in midair |
| CameraTrackingMultiplier | How much the camera should follow the recoil pattern. Too little and the gun doesn’t feel powerful, but too much and your camera goes all over the place! |
WBP_Crosshair
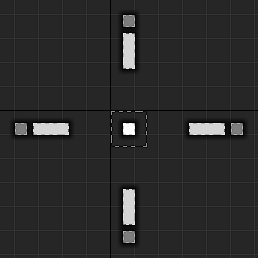
This Widget Blueprint contains the elements that make up the Crosshair. It draws its values from a Crosshair Settings Data Asset, making it highly customizable.

Settings
Crosshair
| Name | Description |
|---|---|
| bUseCenterDot | Enable the Center Dot? |
| bFadeCenterDotWhenFiring | Should the Center Dot fade out while firing? |
| bCenterDotMovesWithFireError | Should the Center Dot animate with vertical fire error? |
| CenterDotColor | The color of the Center Dot |
| CenterDotThickness | The size of the Center Dot in pixels |
| bUseInnerLines | Enable the Inner Lines? |
| InnerLineColor | The color of the Inner Lines |
| InnerLineLength | The length of the Inner Lines in pixels |
| InnerLineThickness | The width of the Inner Lines in pixels |
| InnerLineOffset | The distance from the center in pixels at which the Inner Lines start |
| bInnerLinesUseMovementError | Should the Inner Lines animate with player movement? |
| bInnerLinesUseFiringError | Should the Inner Lines animate with gun recoil? |
| bUseOuterLines | Enable the Outer Lines? |
| OuterLineColor | The color of the Outer Lines |
| OuterLineLength | The length of the Outer Lines in pixels |
| OuterLineThickness | The width of the Outer Lines in pixels |
| OuterLineOffset | The distance from the center in pixels at which the Outer Lines start |
| bOuterLinesUseMovementError | Should the Outer Lines animate with player movement? |
| bOuterLinesUseFiringError | Should the Outer Lines animate with gun recoil? |
| bUseOutlines | Enable Outlines? |
| OutlineColor | The color of the Outlines |
| OutlineThickness | The thickness of the Outlines in pixels |
| MovementErrorMultiplier | The amount of movement when the player moves |
| MovementErrorSpeed | The speed of the movement when the player moves |
| KickbackMultiplier | The strength of the kickback movement |
| FireErrorMultiplier | The intensity of the recoil pattern movement |
| FireErrorSpeed | The speed of the recoil pattern movement |
| FireErrorStartFade | The distance from the center at which the topmost line starts to fade out |
| FireErrorEndFade | The distance from the center at which the topmost line has fully faded out |
| FireErrorMaxiumumHorizontal | How far the fire error will move the Crosshair horizontally. Reduce this value if crosshair movement is a little too wild when the recoil makes it move back and forth. |
Frequently Asked Questions
Does it support multiplayer?
Absolutely. At the moment the client handles most of the recoil calculation, informing the server as to where to trace the trajectory of each projectile. If you’d like to add additional anti-cheat protection or gameplay effects look for where the decals are placed as a good starting place.
Does it work in VR?
I don’t see why not, but I’ve not tested it. If you’d like me to confirm before you purchase, let me know!
Why does my Crosshair get weird when I change my project’s DPI Scaling settings?
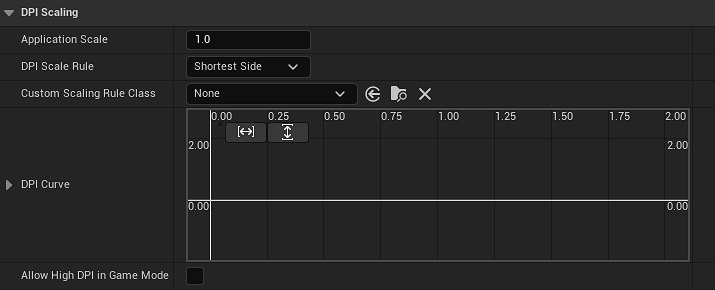
By default Unreal will try to scale your interface elements using a DPI Curve to ensure that their relative scale is consistent across a broad range of resolutions and aspect ratios. The weirdness you are seeing may be because your Crosshair is really thin (between 1-2 pixels) and as the engine tries to scale the Widget it ends up being spread across ‘half’ a pixel, making things look a little lopsided.
In the demo project I’ve solved this issue by turning DPI Scaling off entirely. This is great for me, but its a global setting so it may not be desirable if you have other interface elements that rely on it.

This is a tricky situation, and the solution may be to tweak the DPI Curve until your Crosshair looks as you expect. If that isn’t working out you may need to have multiple crosshairs for each of your target resolutions, or add some additional logic so WBP_Crosshair automatically adapts to different resolutions.


