Writing code within the framework of a modern game engine can seem like a daunting prospect. Fortunately, Unreal Engine’s visual scripting language Blueprint has lowered the barrier of entry and made it easier than ever to create your own game logic. However this doesn’t mean it can’t get messy, complicated, or confusing at times, and maintaining your code is important no matter what development environment you’re using.
Keeping your Blueprint graphs neat and tidy is not difficult, but it does require a solid understanding of best practices within the editor, knowledge of the toolset the engine provides, and consistent effort to maintain your graphs so things don’t get out of hand. Here are the best 10 tips I’ve found for keeping your Blueprints organized:
- Have a style guide (and stick to it)
- Use modular design patterns
- Make liberal use of comments
- Assign variable categories
- Master the Alignment tools
- Keep your wires tidy with reroute nodes
- Use fewer nodes to achieve the same goal
- Collapse your graphs into manageable groups
- Use functions for repeated sections of code
- Consider third-party plugins (list included)
By adopting a combination of these techniques your Blueprint graphs will be far more legible (absolutely critical if you’re working with other people) and easily extended as you continue to add functionality to your game.
However, before we get into the details I think it’s important to quickly cover why all of this is such a big deal.
Why is so much organization necessary?
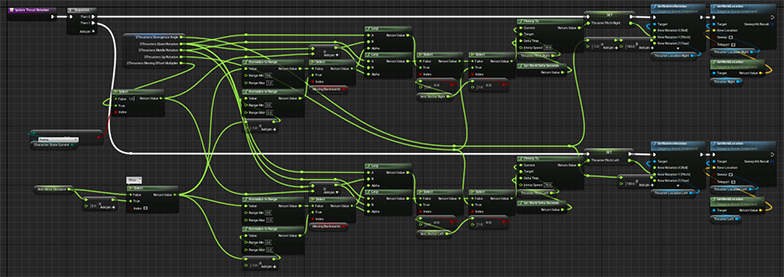
We’ve all seen Blueprints from Hell. It’s that special kind of ‘spaghetti’ that can take hours to unravel. I like to think we’ve all been responsible for this kind of mess at one time or another. I know I have!
The reason we should all be organizing and maintaining our Blueprints so diligently is for both clarity and collaboration.
Messy graphs with no structure and inconsistent style are difficult to read, and even more difficult to work with. At the top of some dedicated time to work on your project, if you have to take an additional few minutes to untangle the wires and figure out what you were doing the last time you opened your project, you’re going to end up with hours of lost production time over the course of the game’s lifecycle. This is especially true if you’re working with other people. No one is going to thank you for wasting their time figuring out your mess.
The following tips are the lessons I have learned and the rules I follow personally when working within Blueprint. It is still something I am figuring out for myself, so where appropriate I will try to explain some of the rules I have abandoned along the way, and why I decided they were no longer helpful.
I encourage you to find a system that works for you. Take from this what you find useful, but most importantly talk to your team. Discuss and decide how you’re going to organize your Blueprints as a group. Otherwise you will likely struggle to enforce it.
When should I organize my graphs?
This might be a contentious question, and my answer may ruffle some feathers. I believe the appropriate time to organize (and sometimes refactor) your graphs is when you’ve finished prototyping a feature or hit a similar minor milestone.
Making your nodes neat as you go is a perfectly acceptable way to work, but if you’re experimenting with functionality, moving chunks of nodes around and trying different configurations, then making all of that presentable on the fly can really slow you down. In the immediate short-term, a graph you’re actively working on will always be a bit messy, that’s just part of the process.
On the other hand it’s very important that once you’ve finished working on a section of code you do your due diligence and make sure it’s legible. You never know when you might be back. Maybe someone else will get there first.
If you’re using source control (and you absolutely should be, even for a solo project), never ever commit disorganized or broken Blueprints to your repository. Try to make a habit of cleaning up and reviewing your work just before you push it to source control. Your teammates will thank you.
#1) Have a style guide (and stick to it)
A style guide is a document containing detailed instructions on how your Blueprints (amongst other things) should be presented. Depending on its granularity it will dictate how your graphs are structured, how comments work, where nodes are placed, and more.
In many ways this article itself is part style guide to working within Blueprint Actors, and if you’ve not got a style guide already feel free to start here. If you already have one, then have a think about how it compares and take what you find useful.
Here are some common questions to ask yourself when considering Blueprint development style, with my personal opinion on each.
Further reading
If you’re looking for a more all-encompassing style guide for working within Unreal I highly recommend checking out Michael Allar’s comprehensive ue5-style-guide on Github.
Should dependent nodes go alongside or underneath their parent?
This is an easy one, and it really just comes down to personal preference. When arranging your graphs, do you put dependent nodes (like variables being plugged into a function) alongside their parent or underneath it?
One option takes up more horizontal space, but (at least to me) is much easier to read. The other is more compact and neat, but S-shaped wires make me a little uncomfortable.
Do I prefer if my execution line goes strictly from left to right?
Your execution line is the thick white wire which dictates the order in which Blueprint nodes are executed. This one isn’t just about keeping it straight, but rather about the general flow of your logic.
Blueprint is designed to go from left to right, top to bottom, but how much verticality your graphs have is up to you. In general, I want to assume that the further to the right I move in the graph, the further along the execution chain I am going. As such, in general I try to avoid Sequence nodes as this usually means doubling back.
I will sometimes include exceptions to this rule to split up large chunks of code that need to run sequentially, like updating a character’s state before calculating their movement.
What is my attitude towards long wires?
The Blueprint editor can struggle with accurately representing really long wires, and it’ll often draw them incorrectly. Even with reroute nodes, which we’ll get to, long wires are one of the main offenders in the spaghetti we’re trying to avoid.
An alternative to longer wires is to use more nodes. If you’re plugging the same variable into multiple disparate functions in your graph, use multiple ‘gets’ instead. At the end of the day it’s all the same performance-wise as the Blueprint will fetch that value multiple times either way as it may have changed in the intervening logic.

How far apart do I want my nodes to sit?
Node spacing is an interesting one, and like most of these questions it’s a tradeoff; this time between how much space your code takes up on the graph, and how easy it is to follow.

Cramming nodes together makes for a more difficult to read graph, but because it’s so compact you can work in a smaller space and see more of your code at once.

Spacing your nodes further apart makes it much easier to see the flow of logic when zoomed out, but you’ll be panning the graph a lot more as you work.
#2) Use a modular design pattern
I have found that monolithic architecture within Blueprint (where most of your functionality is stored in one actor) isn’t the greatest idea. This is especially true if your game is in any way more complicated than a project like Tappy Chicken.
Luckily Unreal provides a lot of tools to help you structure your Blueprints in a modular way so you can reuse functionality and make sure that each graph is only as complex as it needs to be.
Using Blueprint Components is a great way to attach additional logic to your actors. You can create them from within the Content Browser just like any other object, and you can add them to your Blueprint Actors to augment their functionality.
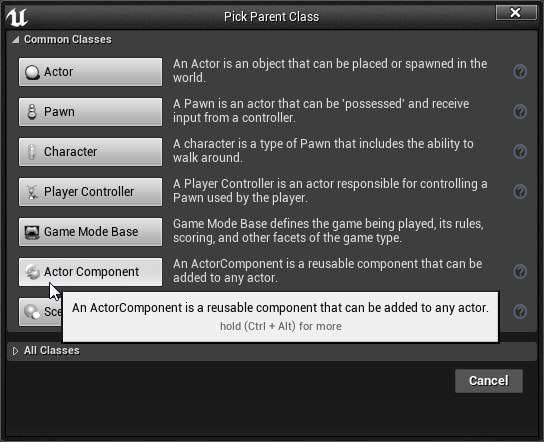
Classes menu when you create a new Blueprint.
As a practical example, let’s say you’re making a shooter game. You’ve created an Enemy Blueprint which contains logic for movement, pathfinding, and target selection. Now you’re looking to add variety by giving these characters different weapons.
You can now create a component for each weapon type (or extensions of a more generic ‘weapon’ class) and attach it to each Enemy. This way, the characters share as much functionality as possible, and there is a single source of truth for the behaviour of their weapons.
If you decide to add more weapons or swap them around you can just reassign the components. It’s an intuitive and effective way to structure your code.
This kind of modular design does take a deal of forethought, and if you’re caught mid-development and are considering refactoring your code I don’t envy your position. That said, its definitely worth considering adding modularity to your architecture wherever you can. It will save you a lot of time in the long run.
One Blueprint to Rule Them All isn’t helping anyone if it takes over 30 seconds to save and only one person can have it open at a time.
#3) Make liberal use of comments
I can’t overstate the importance of commenting your code, and it’s not just something you do for other people. Good documentation will help you in 3 months time when you come back to make tweaks to your graph and you’ve forgotten what in the world you were thinking.
Leaving useful comments in your graphs will save you a lot of time, money, and emotional energy.
Node comments
There are two types of comment you can make in Blueprint. The first is adding notes to individual nodes, which you can do by right clicking them. These tags can scale with the node or be pinned so they’re always legible.

I tend to use this type of comment as a way to flag nodes that need particular attention. I use them to mark ‘magic numbers’ that need to be addressed, and to make note of specific nodes that I think might be causing issues.
Comment boxes
You can create a comment box by selecting ‘Add Comment to Selection’ from the Actions menu, or by pressing the shortcut C. Comment boxes can be moved around just like any other node, and they have a few options for customization.
You can change their size by dragging out from their borders, and by selecting them you can alter their tint, opacity, and whether or not nodes within their bounds are carried with them or left behind when the box is moved.

Comment boxes are perfect for marking down the purpose of a group of nodes. I use them in any graph where I can easily break up the functionality into discrete actions. I tend not to use comment boxes in smaller graphs that only execute a single task, like setting a simple value.
These days I prefer to keep all of my comment boxes the same color and rely on their description to define the purpose of the nodes within. I just think my graphs are easier to work with that way. That’s just me though, and I change my mind all the time. I encourage you to explore your options and find a color system that works for you. Just remember to keep it consistent.

Heads up
If you have nodes selected when you create a Comment box it will automatically be sized to encompass them. Unfortunately when done this way the box rarely ends up sitting on grid. What’s worse, if you move that box at all it will snap back to the grid, and in the process offset all of the nodes within. What a nightmare!
A devil’s advocate opinion on comments
A colleague once told me that if a Blueprint graph was made properly, it’s purpose should be self-evident and comments wouldn’t be necessary. His contention was that you only need to comment your code if it’s not well made, because good graphs don’t need explaining.
It made for a lively discussion, to say the least.
Edit, June 2023: It’s been some time since I wrote this article, and these days I tend to agree. Good code is most often self-explanatory, but comments don’t hurt.
Edit, April 2024: I have swung back around on this. Comments are incredibly useful. Use them!
#4) Assign variable categories
As your Blueprints get bigger and more complex, you’re going to be wrangling a lot of variables. It’s important to have a standardized manner of sorting them into categories or working with them will become increasingly difficult.
The category setting can be found in your variables details panel, but what you might not know is that you can also use this symbol | (sometimes called a pipe) to create subcategories. For example, the setting Character|Locomotion will create a Locomotion subcategory under the Character heading.

Have a think about how you want to organize your variables. I tend to keep exposed parameters in a separate category called ‘Config’. It just makes it easier to find them when I set up instances of that Blueprint in my level.
#5) Master the Alignment tools
The Alignment section of the menu can be found by right clicking any node in your Blueprint editor, and it has several options for automating node placement. These are mostly self explanatory, and will affect any nodes you have currently selected.
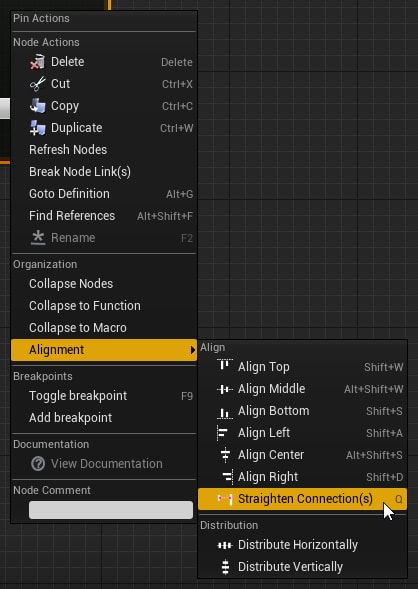
Learning the shortcuts to these tools can seriously speed up your workflow, and it’s very much worth taking the time to practice them. Just remember that the align tools can move your nodes off-grid. This can make some people (myself included) very uncomfortable.
#6) Keep your wires tidy with reroute nodes
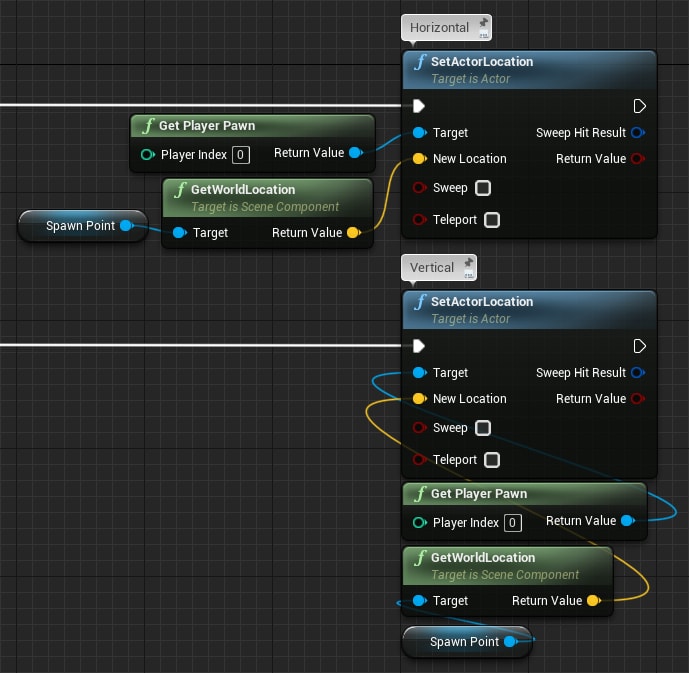
You can double-click anywhere on a wire to create a reroute node. They act as an additional handle you can use to position the wire, and a way to branch a variable into multiple inputs.
The reroute node is your friend. Use them liberally to increase the legibility of your code, prevent wires overlapping with nodes, and to overall reduce the amount of nodes needed in your graph.

#7) Use fewer nodes to achieve the same goal
In general, the fewer nodes you need to use, the better. It keeps your graphs simple, and makes them easier to maintain. Here are a few quick tips to help you keep the number of nodes to a workable minimum.
Split your structs
A struct is a group of values combined into one variable for ease of use. Vectors and rotators are among the most common structs you’re likely to work with. Any struct can be broken into its component variables using a Break node, but you can also right click on any struct’s input or output pin and select ‘Split’ to get the same result without the need for that extra node.
If you need to merge them back in, you can right click and select ‘Recombine’.
For math-heavy graphs, this can significantly cut down on the number of nodes needed to get the job done.
Select nodes
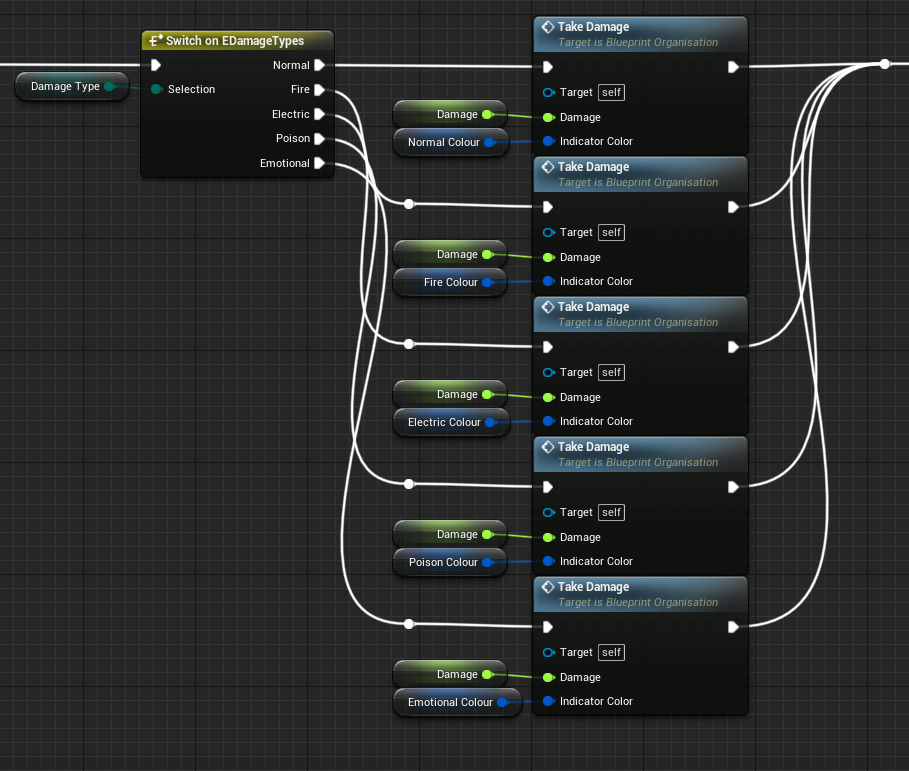
The Select node is incredibly versatile, and can used to elegantly reduce the amount of nodes in your graph. The way it works is simple: It will select a value from a list of user-defined variables based on a condition. This condition can take the form of an enumeration, boolean, or integer.
This is especially useful for replacing Switches and those cumbersome sequences of Branch nodes. It does the same job in less space, and you won’t need to split your execution chain.

Click any of the images for a higher resolution version.
One important caveat that you should keep in mind is that unlike Switch or Branches, the Select node will check every single input to make sure it’s valid and throw a warning if it discovers a null reference. If your inputs might not exist when the Select node is called, I would suggest finding another solution.
Validated Get nodes
If you’re going to check if a variable is valid before using it, there was a time where you’d have needed to pass it through a ‘Is Valid’ function. Not anymore!

Right click on your value and select ‘Convert to Validated Get’ to do the same thing, but all in the one node. Much nicer.
#8) Collapse your graphs into manageable groups
Useful for compartmentalizing chunks of logic for different purposes within the same Blueprint, you can right click and ‘Collapse’ a selection of nodes into its own sub-graph. These Collapsed Graph nodes can have their own input, output, and execution pins.
Although you can collapse any node, including those within Functions, my personal preference is to stay only one layer deep. I find it’s easier to make my way around. Don’t let that stop you from creating graphs within graphs within graphs, though. Whatever works for you.
#9) Use functions for repeated sections of code
As a general rule you shouldn’t copy/paste your code. In Blueprint terms this means if you’ve got sections of your graph made up of the same sequence of nodes repeated over and over, it’s time to turn them into a function.
Functions can be thought of as repeatable sections of logic with one execution input and output. They have their own graph, and can be entirely self contained with their own local variables. If you find yourself using the same sequence of nodes more than once, consider making them a Function.

For more information on working with Functions have a look at this page in the documentation.
Blueprint Function Libraries
This is just a quick side note, as best practices for working with Functions is a bit of a rabbit hole, but if you’re finding yourself using a lot of similar functions across many Blueprints in your project you should consider using a Blueprint Function Library.
You can make as many as you like, and they provide a way to store generic functions that any of the Blueprints in your project can call. It’s a good way of reducing clutter within your individual actors.
#10) Consider third-party plugins
The Unreal Engine Marketplace has an abundance of productivity-centered plugins which can fundamentally change your workflow. The following are some of these that I have worked with personally and found either useful or interesting. Check them out if they seem helpful, but remember that by installing a plugin you are now becoming reliant on a third-party for regular updates and support. Make sure the reward is worth the risk.
Electronic Nodes
Electronic Nodes will change the shape of the wiring in both your Blueprint and Material editors to resemble a circuit board, keeping lines as straight as possible and only using 90 and 45 degree angles.
This is probably one of the most ‘love it or hate it’ plugins I have ever worked with. It can make some graphs look amazingly clean and easy to read, but not mine. I found that to get the most out of it you need to have a lot wider node spacing than you would normally with the default wire implementation.
I worked with Electronic Nodes for about 6 months before switching back to default. It’s not for me, but others I’ve spoken to swear by it so maybe it’s something I’m missing. Try it out for yourself!
Linter
A free plugin by Michael Allar, Linter acts as a watchdog for style guide compliance. Very configurable, you can tell Linter what you want it to look out for: from irregular naming and missing files, to variable naming conventions and function etiquette, and when you run the program it will scan your entire project and compile a report on the things it’s found that don’t match style.
Linter won’t change your files for you (which in my opinion is great news as I don’t like to trust third-party automation), but it will let you know where you can improve, based on what you’ve told the system is important to your project.
I’ve used Linter since its first iteration and I’ve found it incredibly helpful. One of the best plugins on the marketplace.
Final thoughts
That’s it! Thanks a lot for reading what is essentially some guy on the internet’s opinion of how you should organize your game project. I appreciate your time and consideration, and I hope to come back to update this post as my own understanding of best Blueprint practices changes over time.
How you choose to organize your projects can be a really personal decision. I hope you’ve found these tips useful.