If you’re at all familiar working within the Unreal Engine, you’ll have seen it. That little blinking bar in the bottom right insistently informing you that the engine is ‘compiling shaders’.
Depending on how you’ve implemented the Materials in your project you may have several hundred, or several hundred thousand shaders that Unreal says need compiling. This process can range from a minor inconvenience for those with powerful machines, to completely inhibiting those on lower-end hardware from doing anything on their computer for hours at a time.
Both inside and outside the Unreal Editor there are a number of tricks you can try that will significantly lessen the amount of time it will take to compile the shaders in your project, and reduce the amount of shaders that require compilation in the first place. Here are the ones I have found useful:
- Check your Material settings for unnecessary usages
- Reduce shader permutations in your project settings
- Simplify your Materials
- Create more Shader Compile Workers
- Set your Shader Compile Workers to a higher priority
- Minimize editor overhead
- Upgrade your hardware (last resort)
All tried and tested by the Unreal Engine community, these techniques range from refining the way you approach your Material pipeline, changing the priority your system gives Unreal’s compilation tool, to simply upgrading the hardware you’re using in the first place.
Before we get into all of that, though, we need to know what we’re dealing with. Shader compilation can be inconvenient, but it’s a vital part of Unreal Engine’s graphics pipeline.
What is a shader?
In Unreal (and computer graphics in general) a shader is a series of specific instructions detailing how an object is presented visually on screen. As it draws your game world, shaders will inform the engine as to the final pixel values for each frame.
It’s worth noting this technology is ubiquitous in graphics programming, not just in game development, and is a whole discipline in and of itself. It’s a wonderful rabbit hole to explore if you have the inclination.
Shaders can range drastically in complexity and associated performance cost. Here are a few common facets of the final look of your game that can be affected by shaders, in Unreal Engine specifically, just to give you an idea.
- Color
- Translucency
- How your objects respond to light and shadow (including reflection, specularity, and self-shadowing)
- The world position of the vertices of a 3D polygonal object
- Tessellation (the dynamic subdivision of a polygon mesh to create denser geometry)
- Color grading (post-processing)
Shaders ≠ Materials
In your adventures online you may come across the term ‘shader’ being used interchangeably with the term ‘material’. This is especially prevalent in Unreal-engine centered forums and message boards. This can sometimes be a cause for confusion as although they are definitely not the same thing, in Unreal the line is somewhat blurred.
You can think of a Material as the input a developer feeds into a shader to get their desired result. Assigning a texture, setting a color value for example. It defines the parameters that the shader then uses to generate an output.
In Unreal it gets a little muddy because when you’re using the node-based Material Editor you’re making both at once. In the editor, each node represents a module of HLSL shader code that can be linked together to create a custom material/shader combination. It both defines the shader instructions, and sets the parameters it will use. This is why you’ll sometimes see Unreal developers using terms like ‘material’ and ‘shader’ to mean the same thing.
The most important thing to remember for our purposes is that one Material will generate multiple shaders. These are called ‘permutations’, and we’ll go into them in more detail in the next section.
Compiling shaders – Why are there so many?
When Unreal compiles a shader it takes the combined set of modular instructions you have set up in the Material Editor and generates an HLSL shader that the engine can use to render your frame. It’s not as simple as that of course, but that’s the general idea.
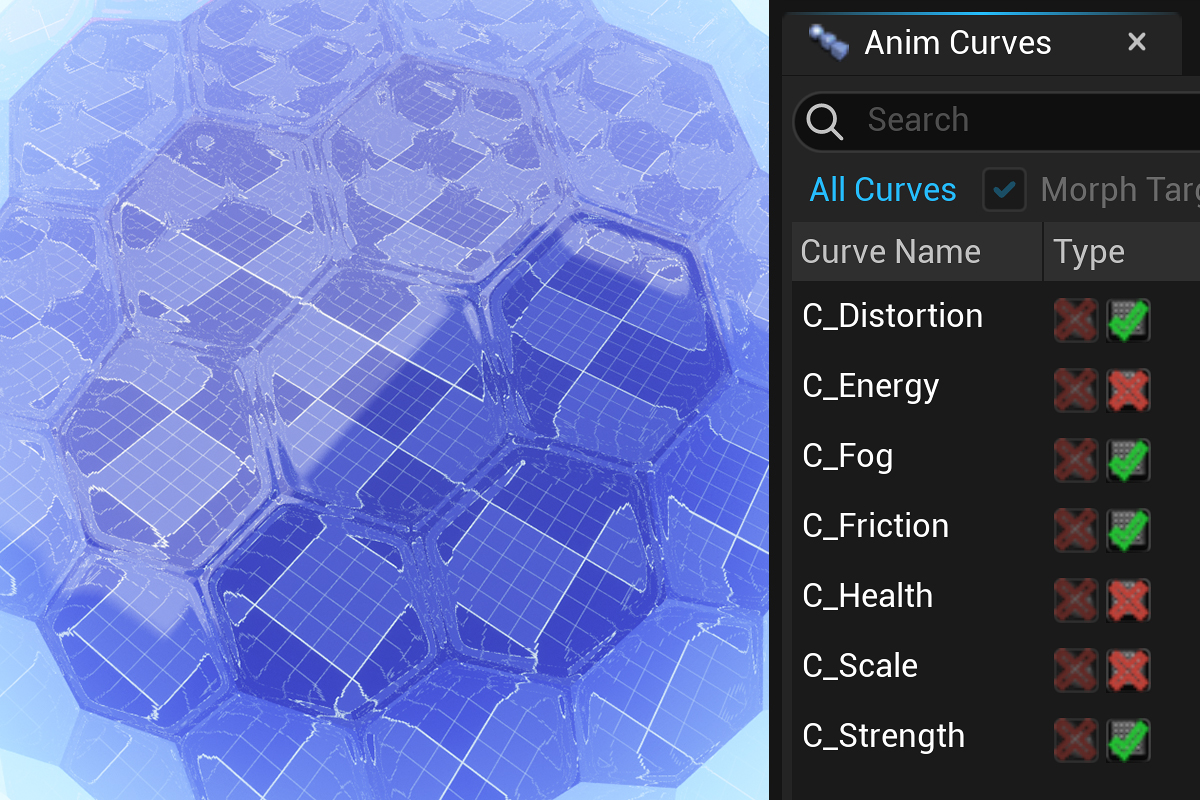
It won’t have escaped your notice, however, that Unreal compiles far more shaders than there exists Materials in your project. This is because for each Material, Unreal will compile a shader for each potential usage case – and there can be a lot of those. You can find some of the common ones in the ‘Usage’ section of your settings panel within the Material Editor.

Each of these “Use with…” checkboxes represents at least one additional shader that needs to be compiled for your Material to support that feature. You can see why things start to add up fast, but that’s not the end of it.
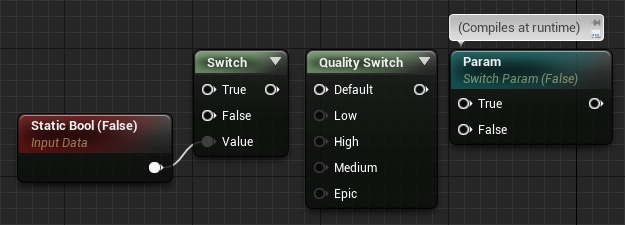
If you’re using Materials which rely on Switches (namely Static and Quality Switches, as Switch Parameters are compiled at runtime), the number of shader permutations for the base Material is doubled for every possible variation.
Landscapes can be especially cumbersome, as each component (a square section on the landscape grid) will generate unique permutations as well. For large worlds this alone can easily make the amount of shaders climb into the tens of thousands.
Now that we know what we’re up against, let’s have a look at ways to reduce how much time the engine will need to spend in shader compilation.
#1) Check your Material’s usage settings
All new Materials are created with a particular setting called ‘Automatically Set Usage in Editor’ set to true. This is a good thing as it means that the engine will only create shader permutations that you need. For example, if your Material doesn’t need to be used with spline meshes it won’t create shader permutations to support that feature.
However if those boxes are checked the engine won’t uncheck them for you if the condition that set it to true no longer applies. If you decide you no longer need the permutations for a particular usage like Niagara sprites, you’ll have to go in and untick that box manually. This would be true even if your Material is no longer applied to any Niagara sprites.
If you’ve got some particularly expensive Materials, especially master Materials with a lot of permutations on their own, it’s worth having a quick look over their your usage settings and making sure you’ve only enabled the features you need. This is particularly relevant if you’ve been prototyping, and throwing a lot of features at the wall to see what sticks.
#2) Permutation reduction in the project settings
In your project settings (towards the bottom of the rendering tab) are two sections called Shader Permutation Reduction and Mobile Shader Permutation Reduction. Here is a series of checkboxes that let you wholesale disable shader permutations for engine features you don’t need. This can significantly reduce the amount of shaders you’ll need to compile.
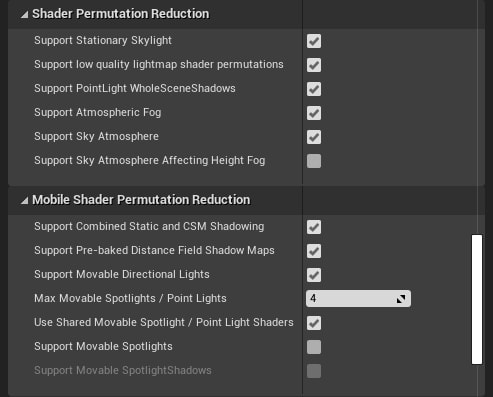
Making any changes here will require an editor restart, and don’t forget to mouse-over for the tooltip. You’ll want to make sure you’re not using a feature that relies on those shaders or Unreal will kick up a fuss.
#3) Reduce the complexity of your Materials
Depending on your Material’s complexity some shaders will take longer to compile than others. A master Material with dozens of features and several branching variations gated by switches, for example, will create a lot of permutations. Each permutation will take longer to compile than shaders generated by something simpler, like an unlit Material.
Sometimes this is just the inevitable cost of having amazing looking surfaces in your games, but make sure you’re making the most of each Material. If you’ve got features you’re not using, cut them out and save some time.
#4) Add more Shader Compile Workers
When Unreal Engine is running through the motions of compiling your shaders, the editor itself isn’t actually doing much of the legwork. That burden falls on instances of a smaller program called a ‘Shader Compile Worker’, which runs behind the scenes.

If you’re on Windows you’ll be able to see them in the Task Manager. If your CPU has multiple threads, you may be able to support more simultaneous Shader Compile Workers than Unreal creates by default. You can add more by navigating to Engine\Config\BaseEngine.ini and editing the following line, where x is the number of threads.
NumUnusedShaderCompilingThreads=x
This is a relatively safe setting to play with. If you set the number of unused shader compiling threads too high Unreal will lower it automatically. Try as it might, it can’t use threads that don’t exist.
#5) Give your Workers a boost
Sorry Mac & Linux users, this is a Windows-only trick. I expect there is a suitable equivalent on other operating systems, but you may have to do some digging.
In the Task Manager’s Details tab you’ll see that by default, like most processes, your Shader Compile Worker’s priority settings are set to ‘normal’. Setting them all to ‘Above normal’ will cause Windows to delegate more system resources to them – speeding up how fast they can get through your shader queue.

You may be tempted (like I was) to set your worker’s priority to ‘High’. I would advise against it. This can give them equal priority to other programs that you need to keep your computer running properly, and can lead to a huge amount of slow down and potentially crash the Editor and/or your computer.
#6) Minimize editor overhead
Unreal Engine’s shader compiler uses an asynchronous streaming system where it will queue up shaders to be compiled, and process them one by one as you work. This is sometimes useful because it allows development to continue uninterrupted, but if you want your shaders compiled as fast as possible and out of the way it’s not as helpful.
The Unreal Editor itself is very taxing on your system’s resources, even when you’re not doing anything. This means that a good portion of your CPU (sometimes up to 80%, even when idle!) is busy just managing the editor. This doesn’t leave much space for the Shader Compile Workers to do their thing.
Making sure that the editor is not the active window will help, as Unreal will automatically use less system resources when not in focus (if you’re simulating your game you’ll notice your fps will drop significantly).
If you’d like to keep working though, you can still save some time by toggling off the realtime preview in your viewport by pressing Ctrl+R.
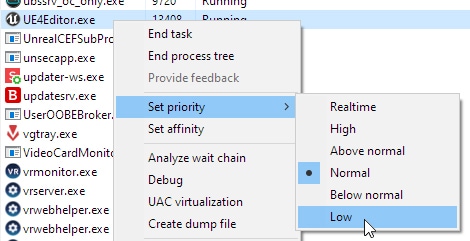
I have had mixed results with this technique, but others have found that setting your editor’s priority to ‘Low’ also helps a great deal.
#7) Upgrade your hardware
If you’ve done everything else and you’re still not satisfied with how fast you can churn through your shader queue, it might be time to look at upgrading your hardware.
Shader compilation leans almost entirely on your CPU. If you’re looking to upgrade your rig, that’s where I’d start. Installing Unreal on an SSD is also highly recommended!
Compiler Booster
This one isn’t really a tip or trick (more of a sales pitch, to be honest!) but hear me out. If you head over to the Unreal Marketplace you’ll find an engine plugin called Compiler Booster, made by Corentin Guillaum.
Compiler booster provides an easily accessible interface that lets you set Shader Compile worker priority from within the editor. This includes a checkbox that, when enabled, will automatically set each worker’s priority when it becomes available so you don’t need to keep diving into your task manager every single time. It also has a safety net in the form of a giant reset button that you can hit if your computer starts to strain and you need to claw back some performance.

This plugin is a fantastic time saver, but just to be clear; Compiler Booster doesn’t do anything more than what could be done yourself by following the steps laid out in this article. That said, at $5.99US it’s inexpensive and it automates a fiddly and sometimes frustrating part of the compile process.
It has a few user-experience quirks that could be improved upon. For example your settings are not saved anywhere so if you restart the editor, or if you close the Compiler Booster window (minimizing is okay), they will need to be reset. These issues are minor, and the developer is active within the community so I hope they will be addressed soon.
Sorry again Mac and Linux users, Compiler Booster is Windows-only.
Additional resources
Thanks for reading my article on shader compilation. I hope I’ve helped you discover the biggest time sinks in your compile process, and helped speed up one of the more frustrating aspects of working within Unreal.
I wouldn’t hold it against you if you were just absolutely sick of hearing about Materials and shaders by now, but if the world of shader development has at all grabbed your interest I’d recommend checking out some of these resources. Creating shaders can be a lot of fun, and there is a vibrant and welcoming community online with a wealth of knowledge.
Best of luck with your projects!
- Unreal Engine Shader Development documentation
- A Beginner’s Guide to Coding Graphics Shaders – Learn the ins and outs of HLSL with the ShaderToy beta.
- ShaderTool – An alternative to ShaderToy that’s available on Steam!
- Unreal Engine 4 Rendering by Matt Hoffman – An amazingly comprehensive breakdown of Unreal’s graphics pipeline. Although a little old now, this information is super useful if you want to learn more about what’s going on behind the frame.