
In your technical animation arsenal there are few weapons more powerful (and easy to wield) than Anim Notifies. If you work with real-time animation and you’re not familiar with them, I very much look forward to blowing your mind.
Anim Notifies are a versatile and inexpensive way to append animation-driven functionality to your Animation Montages and Sequences. With a range of different implementations to suit different use cases, the Notify system is a powerful way to trigger frame-perfect events and tie your game logic directly to the action.
In this article we’ll have a look at how Anim Notifies are created and how they work in practice. Along the way we’ll be having a look at some examples from the most recent entry in my Creating a Halo-Style Bubble Shield in Unreal Engine 5 series, which leans heavily on Anim Notifies (and Animation Curves) to drive the lion’s share of its effects and logic.
Table of Contents
What is an Anim Notify?
An Anim Notify is a position or time range within an animation that will execute an action when the playhead passes over/through it. This could be as simple as playing a sound effect or creating a Niagara System, but can also feed directly into C++ and/or Blueprint allowing for practically unlimited potential.
If something in your game needs to be precisely timed to an animation you should strongly consider using an Anim Notify.
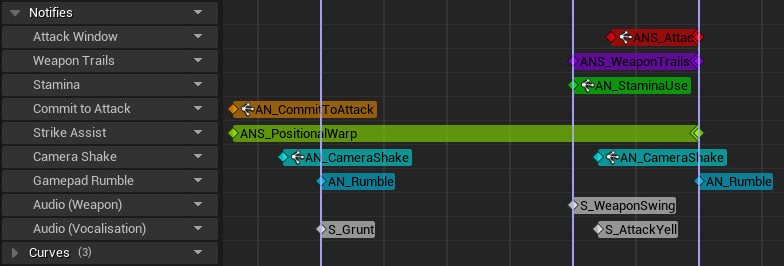
drive a whole host of behaviors, from combat actions to camera shake.
Creating Anim Notifies
At the very top of the Animation Editor’s Sequence Panel is the Notifies section, which can contain any number of tracks upon which Notifies can be placed. These tracks can be labelled, so how you choose to organize them is entirely up to you.

create any number of new ones via the Track dropdown menu.
Right-clicking anywhere on a Notify Track will open the Notify menu, from which you’ll be able to place an existing Anim Notify or create a new one. Using this menu you can create any of the three different types of Anim Notify; the Notify, Notify State, and Sync Marker.
A note on terminology
This naming scheme means that a Notify can be a Notify State or just a Notify, and that a Notify State is also a Notify. Confusing, isn’t it?Unreal uses the word ‘Notify’ as a catch-all to describe all types of Anim Notify as well as a specific type. Personally, this led to a great deal of confusion, so if the terminology doesn’t make sense to you either all I can offer is that you’re not alone.
Notify
The most basic of your options is the Notify, a one-shot event that exists at a single point in time within your animation. The Add Notify submenu is vertically separated into two, the top section reserved for Skeleton Notifies and the bottom for Notify Objects.
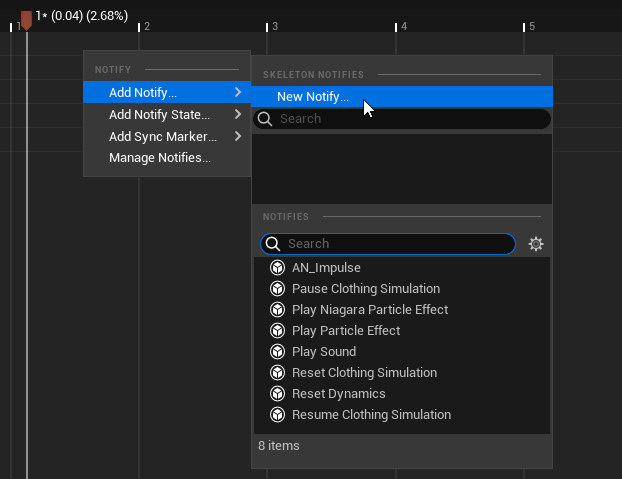
in this menu alongside the engine default ones.
Skeleton Notifies
This type of Notify is stored within a Skeleton asset, and can be called on any animation that uses that skeleton. This is very useful for actions shared within a single asset, like footsteps and weapon trails/impacts. Within the Bubble Shield project I am using Skeletal Notifies to toggle looping ambient audio.
Skeleton Notifies can be created within the Notify menu of any Sequence/Montage by hitting the New Notify button.
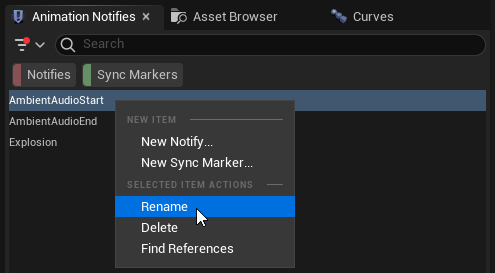
the Skeleton asset via the Animation Notifies panel.
Notify Objects
The bottom part of the Notify menu is for Notify Objects, which can be created like any other Blueprint asset via the Add button in the top left of the Content Browser. When choosing a Parent Class, running a search for Anim Notify will reveal your options.
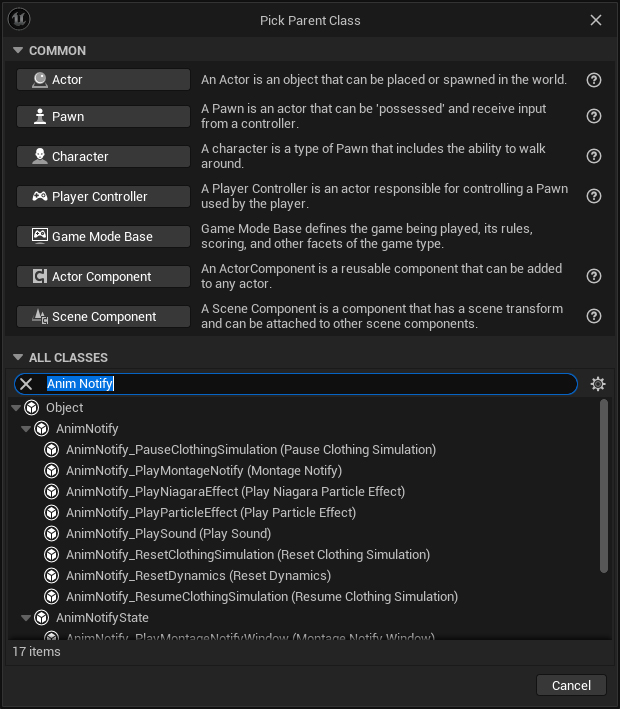
Unlike Skeletal Notifies, which basically send a single message to an Animation Blueprint (more on that later), a Notify Object can also be used to send data and to execute logic within its own self-contained asset. They are not restricted to a single Skeleton and can be used within any Sequence or Montage across your entire project.
I am using Notify Objects to trigger sounds and spawn VFX, as well as to create an upward physics impulse when my Bubble Shield is both activated and deactivated.
Unreal Engine comes with a number of Notify objects built-in, which cover some of the more basic behaviors you’d expect. These include:
| Name | Description |
|---|---|
| Pause Clothing Simulation | Pauses clothing simulation on the skeletal mesh. |
| Play Niagara Particle Effect | Spawns a Niagara system, with transform offset and attachment options. |
| Play Particle Effect | Spawns a Cascade system, with transform offset and attachment options. |
| Play Sound | Plays a Sound Base object, with volume/pitch and attachment options. |
| Reset Clothing Simulation | Returns the clothing simulation on the skeletal mesh to its initial state. |
| Reset Dynamics | Returns any mesh dynamics on the skeletal mesh to their initial state. |
| Resume Clothing Simulation | Resumes clothing simulation on the skeletal mesh (does nothing if already active.) |
Notify States
The Notify State is a little more advanced. Unlike the basic Notify, States have a start and end position which lets you define a time range for the Notify within your Sequence. I’ve not used them in the Bubble Shield project yet, but on previous project’s I’ve relied on them to drive motion warping and to define attack windows for melee strikes.

Notify States cannot exist on the Skeleton and must be their own Notify State Object, inherited from the AnimNotifyState class. The engine comes with a few already, which you’ll see in the Notify list.
| Name | Description |
|---|---|
| Timed Niagara Effect | Similar to Play Niagara Particle Effect, but with an animation-driven end to the effect. |
| Advanced Timed Niagara Effect | A Timed Niagara Effect with some additional parameters exposed to send information back to the Niagara system. |
| Timed Particle Effect | Similar to Play Particle Effect, but with an animation-driven end to the effect. |
| Trail | Creates an AnimTrail particle system between the specified bones. |
Sync Markers
Your final option within the Notify menu are Sync Markers, which allow you to synchronize animations that share the same Sync Group. These are a bit outside the scope of this article, but I thought they were important to acknowledge.
I’d like to do a full breakdown of Sync Groups and how they work someday. If you’re interested, let me know!
Anim Notifies in Blueprint
If you’re familiar working with Blueprint then you’ll be right at home creating/modifying your own Anim Notifies. Each comes with its own graph as you’d expect, and you can hook into the events firing out of the animation by overriding one of the default functions that come with the class.

Exposed variables in your Anim Notify graph will be available in the Notify menu inside the Animation Editor.
Get Default Trigger Weight Threshold
Use this function to set the Trigger Weight Threshold of your Notify, although this is overridden in the details panel in the Animation Editor. We’ll have a closer look at Trigger Weight in the Working with Anim Notifies section.
Get Notify Name
This function will override the name of the Anim Notify, changing it from the default class name to whatever you need.

Received Notify
This function fires once as the Anim Notify is triggered within your animation. It receives mesh, animation, and event data, which you can use to execute a whole range of different behaviors.

Notifies, where I apply a local-up physics impulse to the owning mesh.
Anim Notify States with their variable duration break the Received Notify into three distinct functions that can be overridden independently.
| Received Notify Begin | Fires when the Notify State start point is reached. |
| Received Notify End | Fires when the Notify State end point is reached. |
| Received Notify Tick | Fires every tick while the Notify State remains active. |
Anim Notifies in the Animation Blueprint
Skeleton Notifies are accessible in the Event Graph of any Animation Blueprint based on the same Skeleton. Find them by running a search for the Notify name in your All Actions menu (right click anywhere in the graph).
These Notifies are Events and don’t pass any other data through, so you’re on your own from here!
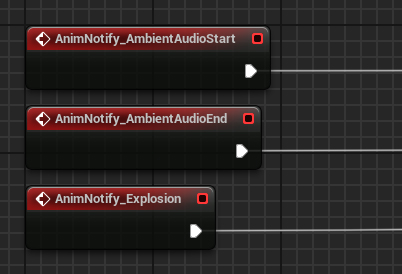
in the Bubble Shield project.
Working with Anim Notifies
Within the Animation Editor, Anim Notifies are a dream to play around and experiment with. To change their position you can drag them horizontally across your timeline, or move them vertically between Notify Tracks.
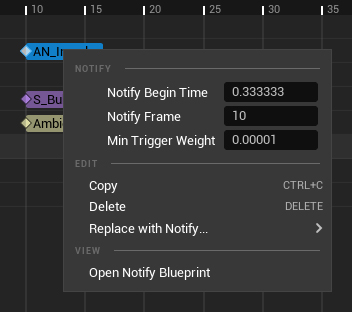
If you’re looking for more precision, right-clicking any Notify marker will open a menu from which you can set their position by frame number or timecode value.
Object Notifies can be triggered from within the Editor, making syncing them to your animation
so much easier. You can turn this off (under ‘Advanced’) if it gets annoying.
Common Notify Settings
Anim Notify
Apart from any additional settings you’ve exposed in your Anim Notify Blueprint (which should also appear here) you’ll find the following settings:
| Notify Color | Adds color your Notify. Perfect for keeping things organized! |
| Should Fire in the Editor | If this box is checked your Notifies will fire as they’re played in the Animation Editor. This doesn’t apply to Skeleton Notifies, as the Animation Editor doesn’t use an Animation Blueprint. |
Trigger Settings
The values in this category concern how and when your Anim Notify is triggered.
| Notify Trigger Chance | A normalized value that determines the likelihood of the Anim Notify being triggered. A value of 1 will make the Notify always fire. |
| Trigger on Dedicated Server | If this box is checked the Notify will fire on Dedicated Servers. |
| Trigger on Follower | Whether or not this Anim Notify will trigger when a corresponding Notify is triggered within the leader of its Sync Group. If you’re not using Sync Groups this does nothing. |
| Notify Filter Type | Use this setting to filter Notifies by LOD, for performance reasons. If enabled, the Notify will be filtered out at the specified LOD. |
Category
I’m not too sure why this category is called Category, but it contains two very important values.
| Trigger Weight Threshold | The Notify will only be triggered if its current weight exceeds this threshold. Consider raising this value if you don’t want your Notifies to fire as the animation blends in/out. |
| Montage Tick Type | This is arguably the most important setting, as it defines how the Notify is triggered when lots of events are happening at the same time. You’re given the choice between Queued, in which the event will fire when it can (but may be off by a frame or two) or Branching Point, in which it will fire on the exact frame. Branching Point is the more expensive option. |

For more information on the Montage Tick Type, the Unreal Engine Documentation provides a little more context.
Tips and tricks
I thought I’d leave you with a few tidbits of information I picked up while working with Anim Notifies over the last year or so. I don’t think I’d be engaging in hyperbole to say that these have saved me and my colleagues from many hours of confused troubleshooting.
I’ll try to add to this list as I discover more!
Notifies and Montage Sections
If you’re working with Animation Montages you’re probably relying pretty heavily on Montage Sections to organize and control the flow of the action. When placing Anim Notifies on Section lines, pay close attention to the diamond shape of the marker. It will let you know on which side of the line your Notify will fire.
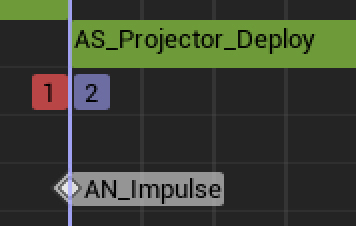
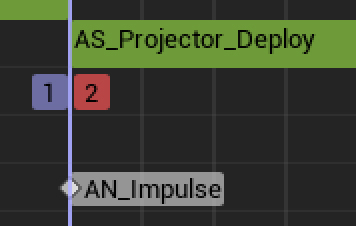
Branching Point exclusivity
Remember that Branching Point Notifies are synchronous, so only one execution chain can fire in a single frame. If you have multiple Branching Point Notifies firing at the same time, only one will actually be triggered and the rest will be skipped. This is true for all Received Notify functions!
Naming conventions
Allar’s world-famous Unreal Engine 5 Style Guide doesn’t really cover Anim Notify Blueprints. In my projects I use AN_<Name> for Anim Notifies, and ANS_<Name> for Anim Notify States, but I’ve also seen the prefix ATT_ used elsewhere.
What convention you choose, just make sure its consistent or you’ll have me to answer to.


